Monday, March 30, 2009

Sweet Potato Sopa De Lima

I cannot seem to get enough of soups and stews lately, and looking through my blog posts, this is quite obvious. But soon the grey clouds will go away, the temperatures will warm, and I will be making almost every meal on the grill. That’s just how it goes, here. :)


I found a recipe for Sweet Potato Sopa De Lima on The Spiced Life. I had only one sweet potato in the pantry and wanted to be rid of it, so I decided to give this a try. With a few alterations, of course (noted below in green type).


Laura used a combination of chicken and pork stock and, since I omitted the chicken to make this a vegetarian meal, I used vegetable broth. I subbed tomatillo salsa verde for the tomatillos, and where Laura used lemon juice, I used lime. And I thickened the final soup with a cornstarch and water mixture (Jack being the kind of guy who prefers his soups to be thick and “not dribbling down my chin”…)


The recipe didn’t indicate how many servings it made, and I would estimate that to be at least 8. But we ate it for 3 days, each time for lunch and with different garnishes, and each bowlful was enjoyed.


Now, I have to say that this tastes better the day after it is made, when the flavors have the opportunity to meld in the refrigerator a bit. The first day, I served the soup with steamed corn tortillas; the second day I served it over cooked brown rice; the third day I stirred the cooked brown rice directly into the soup. We preferred the rice additions. As for garnishes we used chopped fresh tomato and cilantro one day; chopped avocado, cilantro, and cheese the next; and a squiggle of thinned sour cream and some shredded lowfat cheddar on the third day. A nice way to add variety to the same soup when you enjoy it three days in a row!


This soup had a wonderful spicy-and-sour taste, and I do look forward to making it again before these cool, rainy days of spring are over.


Sweet Potato & Tomatillo Sopa De Lima

1 large red onion, chopped
1-2 T olive oil
6-8 garlic cloves, minced
1 large sweet bell pepper, chopped (I used orange bell)
1 jalapeno, seeded and minced
2 t ground cumin
1 t ground coriander
1 t ground New Mexico Chile powder
1 large sweet potato (the orange kind), diced (I peeled it as well)

64 ounces low-sodium chicken or vegetable broth
8 oz chopped tomatoes (or about half a can of diced tomatoes, drained a bit)
1 cup roasted and pureed fresh tomatillos (I used 1 cup of salsa verde)
2 -15 ounce cans of beans (I used one can of black beans and one can of green pigeon peas, drained and rinsed)
1 bag frozen corn, preferably organic, or equivalent fresh
1 1/2 cups shredded roasted chicken (I eliminated this)
1/3 - 3/4 cup fresh lemon juice (I used lime juice; start with the smaller amount and add to taste)

cooked brown rice, optional (I would estimate cooking 2/3 cup of brown rice)

For garnish (any or all):
sour cream
monterey jack cheese
salsa verde

chopped tomatoes

chopped cilantro

chopped avocado

Heat a large soup pot or dutch oven on medium high heat and add the olive oil to heat it to shimmering. Add the onions with a pinch of salt and cook, stirring occasionally, for about 10 minutes.


Add the garlic, jalapeno and bell pepper and cook another 3 minutes. Add the spices and the sweet potatoes and cook, stirring, for about 1 minute. Add the tomatoes and cook for 3 more minutes. Add the tomatillos (or salsa verde) and cook another minute or 2. Add the broth and bring to a boil. Reduce heat to a simmer and cover and cook until sweet potatoes are tender (10-30 minutes, about, depending on how cooked the sweet potatoes got from the frying and how big the dices are).


Add the lime juice and taste for saltiness, sourness, and seasoning in general. Add the beans, corn, and shredded chicken and return to a simmer. Serve with garnishes.


Sunday, March 29, 2009

Garlicky Black-Pepper Shrimp and Black-Eyed Peas

Ahhh, spring in southwestern PA… 55 degree high on one day, the next day is 70, the following day dips to 45… No wonder I can’t seem to determine if my “sniffles” are allergy- or cold-related!


I found a recipe in Gourmet magazine a few weeks ago and prepared it during one of the cooler days during this past week. Garlicky Black-Pepper Shrimp and Black-Eyed Peas is one of those warming dishes that we welcome at this time of year. Spicy (because of the amount of black pepper) shrimp simmered in a fragrant broth with black-eyed peas is very comforting on a raw March day. My only change to the recipe was to use turkey bacon, and reduce the amount of oil a little (because I used a nonstick skillet).


I served this over brown rice, with a green salad, and it was very, very good.


* Exported from MasterCook *


Garlicky Black-Pepper Shrimp and Black-Eyed Peas


Recipe By: Paul Grimes

Servings: 6


Amount Measure Ingredient -- Preparation Method

-------- ------------ --------------------------------


3 tablespoons olive oil -- divided

4 slices turkey bacon

4 scallions -- chopped

1 medium carrot -- finely chopped

1 celery rib -- finely chopped

1/2 medium green bell pepper -- chopped

2 large garlic cloves -- finely chopped

2 Turkish bay leaves -- ( or 1 California)

1 teaspoon dried thyme

1/8 teaspoon hot pepper flakes

18 ounces black-eyed peas -- (2 15-ounce cans, drained and rinsed)

1 3/4 cups low-sodium chicken broth

1 pound large shrimp -- peeled and deveined

1/2 teaspoon freshly ground black pepper

1/4 teaspoon salt

3 large garlic cloves -- minced

1/2 cup dry white wine


Cook bacon in a 12-inch nonstick skillet over medium heat until browned but not crisp. Transfer bacon to a paper towel, press against towel to absorb excess fat, cool, then tear into small pieces.


Wipe out the skillet with a paper towel, then drizzle with 1 tablespoon of olive oil. Cook scallions, carrot, celery, bell pepper, garlic, bay leaves, thyme, red-pepper flakes, 1/8 teaspoon salt, and 1/4 teaspoon pepper over medium-low heat, stirring often, until vegetables are pale golden, about 8 minutes. Add black-eyed peas and broth and simmer for 5 minutes. Transfer to a bowl.


Heat remaining oil (2 tablespoons) in skillet over medium-high heat until it shimmers. Season shrimp with black pepper and salt. Cook shrimp with garlic, stirring occasionally, until just opaque (shrimp will not be fully cooked), about 3 minutes. Add wine and bring to a boil, then briskly simmer 2 minutes. Add bacon and black-eyed-pea mixture and simmer until just heated through (mixture will be juicy). Discard bay leaves.


Serve over hot cooked rice, if desired.


Source:

"Gourmet, March 2009"

- - - - - - - - - - - - - - - - - - -


Per serving: 487 Calories (kcal); 12g Total Fat (2g Saturated); (21% calories from fat); 41g Protein; 56g Carbohydrate; 123mg Cholesterol; 362mg Sodium


Food Exchanges: 3 1/2 Grain(Starch); 4 Lean Meat; 1/2 Vegetable; 0 Fruit; 1 1/2 Fat; 0 Other Carbohydrates


Thursday, March 26, 2009

Avo Saver

I try not to collect a lot of kitchen gadgets, but for some reason my drawers and cupboards are full of them. A few years ago, I did a massive cleaning and reorganization to rid my kitchen of many of these. Since then, I've tried to use a rule while shopping: buy no gadget nor tool which has only one particular use. Mostly, this has worked to keep me from purchasing something that I will rarely use and it has kept my kitchen a little more tidy.

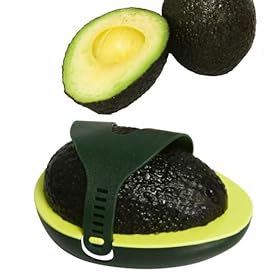
When I saw the Avo Saver at TJ Maxx, I passed it by. But then I started thinking. Several times I need only a half of an avocado and, no matter what I do, I can not get the other half to last for more than a few hours without "turning". I keep the pit in, brush the cut side with lime juice or lemon juice or Fruit Fresh, wrap tightly in plastic... to no avail. So I went back and bought the Avo Saver, figuring that I will use it one time and if it doesn't work, I will return it.


Two days ago I cut an avocado in half, twisted it, and separated the halves. I set aside the half without the pit to use in a salad, then brushed some lemon juice on the other cut half. I placed it in the Avo Saver, tightened the little belt-thing, and put it in the refrigerator. Today I removed the avocado and was quite surprised to find that the cut side was still green-yellow and there was very little oxidation. It works!

Yes, it's definitely an only-one-use kitchen gadget, but I need this! Really, I do! :D

Just thought I'd let you all in on this discovery...

ADDITION!!!

I have used the Avo-Saver several times I still like it!


Here is a photo of an avocado half 53 hours after it was cut in half, brushed with fresh lime juice, and "belted" into the AvoSaver.


I have found that the secret to doing this successfully is to make a nice, clean, even cut so the surface of the avocado fits tightly against the plastic surface of the AvoSaver. Also, do this just after brushing with lemon/ lime juice, while the avocado surface is still wet with the juice. This makes a sort of vacuum "seal". When you finally do release the avocado, you will probably need to twist it a bit to break the seal and release the avocado half.


Tuesday, March 24, 2009

Glazed Double-Chocolate Marble Cake

I am having a difficult time losing my layer of Winter Fat this year, and since I have increased my running I can only blame--- food. Sweets, in particular. No sooner had I finished the Christmas cookies, then Valentine’s Day baking came around, and then, most recently, my Dad’s birthday. I adore chocolate, and haven’t yet met a cake or cookie I didn’t like (my only saving grace, if it should be called this, is that I am not wild about pie). I am also crazy about carbs. I am writing this while eating a nice, warm slice of Mom’s cinnamon bread. Hey, it’s still 2 hours until dinner!


Anyway, Easter looms on the horizon. This year I will not be spending it with my family, so I suppose the only good aspect of this is that the piles of my Mom’s homemade goodies will not be tempting me every second of my waking moments while we are there. But first, as I mentioned, my Dad’s birthday. This was a biggie, #75, and I made his cake.


This was one of three cakes offered that day. My twin nieces were born on the same day as my Dad, so they also have been joining in on his celebration for the past 10 years. Mom made each girl their own cake, too, so there was a lot to choose from. Or maybe not so much, since 20 people blew through most of all 3 cakes and there was little leftover (yay!).


The cake which I made was from Canadian Living’s Holiday Best 2005 issue, Glazed Double-Chocolate Marble Cake. Actually, it is triple chocolate since there is white chocolate and unsweetened chocolate in the batter, and bittersweet chocolate in the glaze. Heaven.


I’ve never had a lot of luck with making cakes from scratch, but have found that bundt-type cakes are much more forgiving than the layer cakes. This one was quite easy to make and tasted absolutely delicious. And that ganache used to glaze it with… wow. It was a perfect “frosting” as it added a nice silky-sweet chocolate taste, yet did not dominate the cake like traditional frostings can do. Basically, this was melted bittersweet chocolate and whipping cream, and some day I will make up a nice, warm bowlful and eat it with a spoon…


Now, I altered the directions from the original recipe a little. I have found that cakes become lighter in texture when the ingredients are not cold, so take out the butter, eggs, and buttermilk beforehand. In fact, the butter should be well-softened, so that ingredient should be taken out earlier if possible. The chocolates which are used in the batter must be melted and cooled before making the cake, so this needs to be done prior to turning on the oven. Yes, it’s a little fussy but marble cakes are. And this one is worth it. I am including the nutritional information at the end of the recipe, but I haven’t yet worked up the courage to look at it.


* Exported from MasterCook *


Glazed Double-Chocolate Marble Cake


Recipe By: Canadian Living Fall 2005

Servings : 16


Amount Measure Ingredient -- Preparation Method

-------- ------------ --------------------------------


2/3 cup butter -- softened

2 ounces unsweetened chocolate -- chopped

3 ounces white chocolate -- chopped

3 large eggs

1 cup lowfat buttermilk

2 1/4 cups all-purpose flour

1 teaspoon baking powder

1 teaspoon baking soda

1/2 teaspoon salt

1 1/2 cups granulated sugar

2 teaspoons vanilla

2 ounces bittersweet chocolate -- chopped

1/4 cup heavy cream


Remove the butter from the refrigerator to soften.


In a glass bowl, melt the unsweetened chocolate in the microwave (or over a pan of hot water) and set aside to come to room temperature. Repeat with the white chocolate.


Take the eggs out of the refrigerator and measure 1 cup of buttermilk; place both on the counter to start to come to room temperature a bit.


Grease a 10-cup Bundt pan and dust with flour (note: I have great results with Baker's Joy in lieu of the grease-and-flour) and set aside.


In a medium bowl, whisk together the flour, baking powder, baking soda, and salt. Divide this dry mixture in half (using a scale or measuring cups), placing in separate bowls. Set both bowls aside.


Preheat oven to 325F


In a large bowl, use an electric mixer to beat the softened butter until creamy. Gradually add the sugar, while still beating, and beat for about 3 minutes or until the mixture is fluffy. With the mixer running, add the eggs (one at a time), and beat well after each addition. Beat in vanilla.


Spoon half of the batter into a medium bowl and stir in the unsweetened chocolate. To the rest of the batter, add the white chocolate and stir well.


Working with the dark chocolate batter, add half of the first bowl of dry ingredients, stir a little, then add HALF of the buttermilk, stir, then add the remaining half of that first bowl of dry ingredients.


Repeat this with the white chocolate batter and the second bowl of dry ingredients (flour, etc.).


Using a large serving spoon, dollop the batter into the bundt pan, alternating dark and light batters. Make 2 or 3 layers of "dollops" in the pan then, when the batters are used, run a spatula through all layers to swirl. Tap the pan twice on a hard surface to break and interior bubbles, and place in the center of the oven.


Bake for about 45 minutes, then test with a toothpick or cake tester. Depending on if you use a dark or shiny pan, it may take up to 55 minutes for the cake to bake completely (the toothpick will come out of the cake with no crumbs attached). Cool on a wire rack for ten minutes, use a small rubber spatula to loosen the cake from the sides and center tube, shake just a bit to further loosen, place a greased wire rack over the top, and invert the cake. Cool completely. (At this point you can hold the cake, wrapped in plastic, for 24 hours; wrapped further in foil it can be frozen for up to a month)


TO GLAZE:


Place chopped bittersweet chocolate in a heatproof bowl. In a saucepan, bring the cream just to boiling over medium heat. Pour over the chocolate and stir until chocolate melts. Let stand for 10 minutes, then brush over the cake (if desired, place strips of waxed paper under the outer edge of the cake to catch the drips). Sprinkle chocolate curls over the cake. Let stand at a cool temperature until ganache is set, about 40 minutes. (Cover cake with bowl or other cover which will not "touch" the surface of the ganache, and store at a cool-ish room temperature for up to 24 hours)

- - - - - - - - - - - - - - - - - - -

Per serving: 301 Calories (kcal); 16g Total Fat; (45% calories from fat); 4g Protein; 38g Carbohydrate; 61mg Cholesterol; 284mg Sodium

Food Exchanges: 1 Grain(Starch); 0 Lean Meat; 0 Vegetable; 0 Fruit; 3 Fat; 1 1/2 Other Carbohydrates


I had no time to take a photo once the cake was cut, and it was very pretty with the dark-and-light swirls.


Ahhh, chocolate curls. The bane of my cake-making existence. I love how they look, but I am rarely satisfied with how they turn out no matter how many tips I read or instructional videos I watch. And a note for those who are interested in the marbleized curls—the white chocolate does not easily bind with the dark chocolate and, only at a very certain temperature, will they choose to curl together without breaking apart. It drove me nuts and took hours, and I still wasn’t satisfied. But everyone ooohed and aaahed, so I figured that it didn’t look too bad! :) Unfortunately, there was a lot of waste. Which is all now on my waist.


Wednesday, March 18, 2009

Spicy Sweet Potato and Peanut Soup with Black Beans

My husband loves peanuts, in all forms, and everyone knows it. My Mom has forever endeared herself to him by, from the first she knew of this particular craving of his, having something containing peanuts to offer to Jack whenever we visit. She would bring out a large can of Planter’s peanuts, remove the vacuum seal, and his eyes would mist over as he smelled those “freshly roasted” nuts. Or she would make peanut butter cookies, or chocolate chip cookies with peanut butter chips, or rice krispie treats with peanut butter frosting, or, as she did when we visited last weekend, brownies with a peanut butter swirl. Mom is a true “spoiler”.


That being said, peanuts are not my favorite. To eat out of hand, I’ll choose almonds, hazelnuts, or even walnuts first. When I do buy peanuts, I choose an inexpensive brand (no fresh-roasted aroma there!) because I will probably be using them to garnish a stir-fry, or as an ingredient in some other recipe, rather than as a snack.


When I was looking through my favorite blogs a couple of weeks ago, I found a very interesting recipe at Lisa's Vegetarian Kitchen, Spicy Sweet Potato and Peanut Soup with Black Beans. I have made sweet potato soup containing peanuts before, but this recipe included peanut butter in its ingredients and my favorite black beans, so I thought I would give it a go. Certainly Jack would love it!


Did I mention that, of the two or three sweet potato-and-peanut soups I have made previously, none of them thrilled me. No wow factor at all. Not that I need to be thrilled by soup, you understand, but it’s nice to be. Adds a little “extra something” to the day. :)


First, it wasn’t a thin soup. There was a definite substance to it even though the vegetables were not pureed. Second, the addition of the black beans added a much-deserved texture and appearance to the soup. Third, it was quite easy to make. And, most importantly, it tasted terrific. Yes, it thrilled me!


I used black beans that I had previously cooked and frozen, so the step of soaking and cooking the black beans was eliminated. For this 6 serving recipe, you could use 2 14-ounce cans of beans (drained). Rule of thumb is that a cup of dried beans equals 2-1/2 cups of cooked beans, which would require about 2 cans for the recipe (there are about 9 ounces of beans in a 14 ounce can once the liquid is drained off). I used less because I had less beans, but I think that I will increase the amount of black beans the next time I make it. I will also add a dollop of plain lowfat yogurt on top of each serving as well.


This is a very unusual soup, but the flavors are all complimentary and quite enjoyable, so I will place it in my short-rotation notebook. And (close your eyes, Lisa) it would also be quite good with some diced chicken breast added.


Quite pretty, isn't it?
You can't easily see the tomatoes in the photo, but the oranges and
yellows and reds, accented by black and green--
Art in a Bowl!


* Exported from MasterCook *


Spicy Sweet Potato and Peanut Soup with Black Beans


Recipe By: Lisa at Lisa's Vegetarian Kitchen

Servings: 6

Amount Measure Ingredient -- Preparation Method
-------- ------------ --------------------------------
1 cup dried black beans
1 tablespoon olive oil
1 large carrot -- sliced
1 large onion -- chopped
2 cloves garlic -- minced or crushed
1 pound sweet potato -- peeled and cubed (about 1 large)
1 teaspoon dried hot red chili flakes -- or to taste
2 medium tomatoes -- chopped
2 cups low-sodium vegetable stock
2 cups water
1/4 cup peanut butter
1 teaspoon sea salt -- or to taste
fresh ground black pepper
1/4 cup fresh parsley -- finely chopped


Rinse the beans and soak overnight covered in several inches of cold water with a little yogurt whey or lemon juice added. Drain, place in a medium saucepan, and cover with several inches of fresh water. Bring to a boil, then reduce the heat to low, cover, and simmer for 1 hour or until the beans are tender but not falling apart. Drain and set aside.


Heat a large saucepan or soup pot over medium heat. When hot, add the olive oil, wait a few moments, then swirl around to coat the pan. Add the carrot, onion and garlic and sauté until the onions turn translucent, about 6 to 8 minutes. Turn up the heat slightly and toss in the sweet potato and chili flakes. Stir for a couple of minutes, then add the tomato and cook until the tomato has reduced slightly, about 5 minutes. Pour in the vegetable stock and water and bring to a slow boil. Reduce the heat to low, cover, and cook until the vegetables are tender, about 15 to 20 minutes.


Stir in the peanut butter and beans and let simmer for another 5 minutes to let the peanut butter melt into the soup and to warm the beans. Remove from heat, and season with salt and plenty of fresh ground black pepper.


Serve hot with a sprinkling of parsley for garnish. Serves 6.


- - - - - - - - - - - - - - - - - - -


Per serving: 282 Calories (kcal); 9g Total Fat (2g Saturated); (27% calories from fat); 12g Protein; 41g Carbohydrate; 0mg Cholesterol; 403mg Sodium
Food Exchanges: 2 1/2 Grain(Starch); 1 Lean Meat; 1 Vegetable; 0 Fruit; 1 1/2 Fat; 0 Other Carbohydrates

Saturday, March 14, 2009

Indian-Spiced Chickpea and Lentil Soup

Chilly March days deserve soup for lunch. I was cleaning out the deep-freeze late one morning last week (I had bought some clear plastic bins and was striving for some springtime reorganization!) and found rather small amounts of cooked chickepeas and red lentils in small plastic freezer bags.Not wanting to put these back in the freezer, where they would get shoved behind larger bags and disappear for another year, I decided to make soup for lunch. I saw a package of Trader Joe’s Tandoori Naan in the freezer as well and, since Indian food is one of my favorites, I decided to make a chickpea and lentil soup with Indian flavors.


This soup would also be good with cooked basmati rice stirred in if no naan was to be had to serve it with. It was quite good, a tomato soup spiced with cumin and coriander, with a nice tang of flavor from the lemon juice and the creamy yogurt. It can be made in less than a half hour, and is quite filling with the hefty amount of fiber which it contains.


* Exported from MasterCook *


Indian-spiced Chickpea and Lentil Soup


Recipe By: Vicci

Servings: 4


Amount Measure Ingredient -- Preparation Method

-------- ------------ --------------------------------


1/2 cup lentils -- red lentils preferred

1 teaspoon canola oil

3/4 teaspoon brown mustard seeds

1/2 teaspoon minced ginger

3/4 teaspoon minced garlic

14 ounces canned diced tomato -- undrained

14 ounces low-sodium vegetable stock

1 1/4 teaspoons ground coriander

1 teaspoon ground cumin

3/4 teaspoon ground turmeric

1/4 teaspoon ground red pepper -- (to taste)

9 ounces cooked chickpeas -- (about one 15-ounce can, drained)

1 tablespoon fresh lemon juice

1/4 cup plain nonfat yogurt


Combine lentils with 2 cups of water in a saucepan and bring to a boil. Cook for about 20 minutes, or until lentils have softened and started to break apart. Remove from heat but do not drain.


After the lentils have started to cook, heat 1 teaspoon of oil in a saucepan. Add the mustard seeds, shake the pan to coat the seeds with oil, and cook over medium heat until the seeds begin to pop (about 30 seconds). Turn off the heat and stir in the garlic and ginger. Add the canned tomatoes (this will spatter a little, so be careful) then pour in the vegetable broth. Add the spices (coriander through red pepper) and chickpeas, turn on the heat to medium, stir well, and bring to a boil Cover partially, turn down the heat, and cook for 15 minutes, stirring occasionally.


When the lentils are done, add them (and their cooking water) to the tomato mixture. Stir and cook for another 5 minutes. Stir in the lemon juice and divide between soup bowls. Garnish with dollops of yogurt.


- - - - - - - - - - - - - - - - - - -

Per serving: 241 Calories (kcal); 4g Total Fat (trace Saturated); (13% calories from fat); 15g Protein; 39g Carbohydrate; trace Cholesterol; 321mg Sodium; 11g Fiber

Food Exchanges: 2 Grain(Starch); 1 Lean Meat; 0 Vegetable; 0 Fruit; 1/2 Fat; 0 Other Carbohydrates


Since this was made on the fly, during a "cleaning day", I did not take the time to snap a photo and now I wish I had. Once we started eating, and I realized just how good this soup was, I just knew that I needed to post it. :)

Wednesday, March 11, 2009

Creamy Spinach Potage

The eating of the green… :) And just in time for St. Patrick's Day!


I needed to make a light lunch the other day, and just happened to have the ingredients on hand for a soup which I had marked to try from an old issue of Vegetarian Times.


I made the recipe as directed except that I subbed a little dried chipotle (for some zing) and shredded lowfat Jarlesberg (for Jack). I decided to incorporate the yogurt-and-milk mixture into the soup and found that, when the last step says to whisk the yogurt and milk until smooth, you need to absolutely whisk the yogurt and milk until smooth. Completely smooth. Lest you have little bits of yogurt floating through your potage. This is why I will use the photo from the VT website… my try at this recipe (this time) was not pretty, but tasted very, very good. And the next time, I will dollop that yogurt mixture on top, as per their directions.


I wish I had a photo of the expression on Jack's face when I told him that we were having spinach soup, but that quickly reversed when he tasted it. Served with slices of multigrain sourdough bread, this was perfect for lunch.


Creamy Spinach Potage


Vegetarian Times Issue: January 1, 2006

Sweeter, creamier and more flavorful than white potatoes, parsnips form the ideal vegetable base for a French potage, or thick, creamy soup. Choose small to medium parsnips that are heavy for their size, and slice them in uniform pieces for even cooking.


Ingredient List

Serves 8

  • 2 tsp. olive oil
  • 1 large onion, chopped (about 1 1/2 cups)
  • 1 stalk celery, sliced (about 1/3 cup)
  • 2 low-sodium vegetable bouillon cubes
  • 1 1/2 lb. parsnips, peeled and sliced (about 4 cups)
  • 3 cups baby spinach
  • 1/3 cup low-fat plain yogurt
  • 2 Tbs. low-fat milk or plain soymilk

Directions

  1. Heat oil in large pot over medium heat. Add chopped onion and celery, and cook 2 to 3 minutes, or until vegetables are softened. Add 6 cups water, vegetable bouillon cubes and parsnips. Bring to a boil. Reduce heat to medium-low, then cover and simmer 20 to 25 minutes, or until parsnips are tender.
  2. Increase heat to medium-high, and stir in spinach. Cook 1 minute, or until spinach wilts but is still bright green.
  3. Transfer soup in batches to blender or food processor, and purée until soup is smooth. (Or purée soup in pot using an immersion blender.) Season soup to taste with salt and pepper. Return soup to pot, and keep warm. If making soup ahead of time, refrigerate it until an hour before you plan to serve it, then warm soup over medium heat, but do not boil.
  4. Just before serving, whisk yogurt and milk in small bowl until smooth. Serve bowls of soup topped with dollops of yogurt mixture.

Nutritional Information

Per SERVING: Calories: 82, Protein: 2g, Total fat: 1g; Carbs: 16g, Cholesterol: 1mg, Sodium: 280mg, Fiber: 5g, Sugars: 1g

Monday, March 9, 2009

Hoisin-Glazed Salmon

Some days, you just need a good quick dinner…


This is one of Jack’s favorite meals and, coincidentally, it just happens to be so fast that it’s one of my favorites as well. I walk in the door, go to the freezer, dig up a packet of salmon, and place it in a large bowl of cool water. This will thaw the fish nicely in about a half hour. Then I do whatever I have to (change clothes, unload the car of grocery bags, etc.) for fifteen minutes or so, put some rice on to steam, prep veggies, make the sauce for the salmon, and then it’s time to start cooking.


Once the broiler is turned on, I start the vegetables. By the time the fish is cooked, the veggies and the rice are as well and we can eat. :)


* Exported from MasterCook *


Hoisin-Glazed Salmon

Recipe By: Vicci

Servings: 2


Amount Measure Ingredient -- Preparation Method

-------- ------------ --------------------------------


1 tablespooon hoisin sauce

1/2 tablespoon low-sodium soy sauce

2 teaspoons rice wine vinegar

2 teaspoons brown sugar

1/2 teaspoon minced ginger

1/2 teaspoon minced garlic

1/2 teaspoon sesame oil

1/4 cup orange juice -- DIVIDED

12 ounces salmon fillet

1 tablespoon sesame seeds

2 tablespoons sliced green onions

Preheat broiler or grill.


Mix the hoisin sauce through sesame oil in a small microwave-safe cup. Add 2 tablespoons of the orange juice and stir. Brush over the surface of the fish and broil for 3 minutes. Turn, brush with some of the remaining hoisin mixture, and broil an additional 3-4 minutes or until done. Meanwhile, add the remaining 2 tablespoons of orange juice to the remaining hoisin mixture and microwave on high until it comes to a boil (about 1 minute).


Serve fish drizzled with the hoisin/orange sauce, sprinkle with sesame seeds and sliced green onion.


- - - - - - - - - - - - - - - - - - -

Per serving: 320 Calories (kcal); 9g Total Fat (1g Saturated); (26% calories from fat); 36g Protein; 21g Carbohydrate; 88mg Cholesterol; 716mg Sodium

Food Exchanges: 0 Grain(Starch); 5 Lean Meat; 1/2 Vegetable; 0 Fruit; 1/2 Fat; 1/2 Other Carbohydrates

Tuesday, March 3, 2009

Soba Noodles with Chicken and Vegetables

In order to increase the amount of whole grains in our diets, I have slowly begun to use more brown rice than white over the past year or so. Fortunately, the food co-op sells brown basmati in bulk for a low price and I also found a brand of brown parboiled for those times I use something other than basmati (not often, but it happens).


Whole wheat pasta has long been a pantry staple here, and our local grocery carries a selection of spaghetti, linguine, and penne that has a nice (not grainy) texture. I usually cook about 2/3 wheat and 1/3 semolina when I make pasta.


A few months ago I saw Japanese soba and udon noodles in, of all places, Big Lots. Soba noodles are flat, narrow, and made from whole wheat and buckwheat flours; udon noodles are wider and made from wheat flour. Having used both, we decided that we prefer soba, both in taste and width.


It is easy to boil these noodles until they break apart into tiny pieces. The package instructed that they are to cook for 8 minutes, but I have learned to start testing them, every 30 seconds, starting at 6 minutes.


I made one of my favorite on-the-fly noodle recipes for dinner last night. Until now, I’ve never really measured the ingredients but I did and now can post it. Jack calls this my “best noodle recipe ever”. In fact, two hours after we finished, he complimented me on it yet again. There are lots of veggies and lean chicken strips tossed with the noodles in an absolutely delicious hoisin/soy based sauce, and the best part is that it can be put together in twenty minutes. The first thing that I did was to only partially thaw the chicken breast, which made it very easy to slice thinly; it thawed the rest of the way while waiting for the veggies to be cut and the sauce put together.


Now this is a bit higher in sodium than I am comfortable with, even using low-sodium soy sauce (is there such a thing as low-sodium hoisin? I’ve never noticed it), so watch your sodium intake for the rest of the meals around this one. We don’t eat many prepared foods at all, so we are able make that sodium-splurge occasionally.


And one more note, this makes 2 very nicely-sized servings. I have been trying to watch my portion sizes closely and am often disappointed by how little food actually gets onto my plate...


* Exported from MasterCook *

Soba Noodles with Chicken and Vegetables


Recipe By: Vicci
Servings: 2


Amount Measure Ingredient -- Preparation Method
-------- ------------ --------------------------------

2 tablespoons hoisin sauce
1 1/2 tablespoons reduced-sodium soy sauce
1 1/2 tablespoons water-- if it is available, using chicken or veggie broth would be more flavorful
1 teaspoon rice vinegar
1 large garlic clove -- crushed
3/4 teaspoon Sriracha sauce
6 ounces soba noodles – can also used whole wheat linguine
6 ounces boneless skinless chicken breast -- sliced into thin strips
3 ounces carrots -- julienned, about 1 cup
4 ounces broccoli florets -- about 2 cups
4 ounces red bell pepper -- cut into 1/4" wide strips, about 1 cup
2 large green onions -- sliced; save green tops to garnish
2 tablespoons chopped peanuts


Place a pot of water on the stove to boil for cooking the noodles.
Combine the hoisin sauce through the Sriracha sauce in a small cup and set aside.


Prepare vegetables and chicken and set aside.


In a nonstick wok over medium-high heat, drizzle one teaspoon of the canola oil. Add the chicken and stir-fry for about 3 minutes, or until the chicken is opaque and no pink remains. Remove, with a slotted spoon, to a bowl and set aside.


At this point, add the soba noodles to the boiling water. Since they can overcook so easily, set a timer for a minute or two less than the time indicated on the package instructions. Whole wheat linguine, if used, is much less time-sensitive (also, if using the linguine, delay starting the next steps for a few minutes since these take longer to cook than the soba noodles).


Heat the remaining oil in the wok (still over medium-high heat) and add the carrots and broccoli. Stir fry for 2 minutes and add the red bell pepper and stir fry for another minute. Add the green onions (except for the green tops) and stir fry for one additional minute. Add the chicken, with the accumulated juices in the bowl, and the sauce. Stir. Drain the noodles, shake the colander to get rid of excess water, and fold the soba noodles into the chicken and vegetable mixture.


Divide between 2 plates, sprinkle with reserved green onion and chopped peanuts.


- - - - - - - - - - - - - - - - - - -

Per serving: 545 Calories (kcal); 6g Total Fat (1g Saturated); (10% calories from fat); 38g Protein; 90g Carbohydrate; 49mg Cholesterol; 1698mg Sodium
Food Exchanges: 4 1/2 Grain(Starch); 3 Lean Meat; 2 1/2 Vegetable; 0 Fruit; 1 Fat; 1/2 Other Carbohydrates

Monday, March 2, 2009

Spiced Chicken and Chickpea Stew

I was leafing through a past issue of Cooking Light and a recipe caught my eye. After I made a note to copy it from the website, I took another look at the recipe beside it. “Sweet and Spicy Chicken and White Bean Stew” was a reader submission and, a few months ago when this issue came out, the name did not appeal to me so I passed it by. However, as I read the ingredients more closely now, I was intrigued. Featuring a definitely Indian list of spices, so I decided to give it a go. With several modifications, of course. And why do I cook if not for an excuse to do my own thing????


The directions called for not draining the white beans but I did because, well, that thick, whitish liquid was kinda gross. :) I added an equivalent amount of low-sodium chicken broth to make up for that. Also, I had no fire-roasted tomatoes, as specified in the original recipe, so I added some ground chipotle pepper for a smoky flavor (and more heat).


A cup of light coconut milk was called for. I don’t like to use all coconut milk, even light, in recipes and prefer to sub half skim milk and add a little coconut extract at the end of the cooking time. This, I have found, gives a more coconut-y flavor with much less fat.


When I tasted the stew near the end of the cooking time, I felt that it lacked something. I doubled the spices then added cumin, and this helped a lot. Some frozen cut green beans for color and an extra serving of vegetables, and it was done.


This stew was fantastic! The coconut milk added a smoothness (and a wonderful coconut flavor) to the tomato-based broth, with the mixture of spices dancing around, none overpowering each other at all. The lemongrass is listed as an option, but do try to add it. I bought several stalks while at the Strip a few weeks ago and froze them-- texture or flavor was not compromised. I am writing this a week after I made the stew and I've already put it back on my lunch rotation for this week (I do not often repeat recipes, especially this soon, unless they are worthy).


This next time I will use chickpeas instead of the white beans (which will bump up the fiber content by almost 300%), and perhaps leave out the chicken altogether because it will make a great vegetarian stew (subbing veggie broth for the chicken, of course). It was very, very flavorful, and a piece of Trader Joe’s naan was the perfect side.


The recipe contains a long list of ingredients, but prep them first and putting it together will be a snap. And we found that the leftovers taste even better.


Because of the many changes I made, I am now renaming this and calling it my own creation. But I do appreciate the author’s idea, and also her use of cardamom, a spice which I have in several forms but never seem to use much.


* Exported from MasterCook *


Spiced Chicken and Chickpea Stew


Recipe By: Vicci

Servings: 4


Amount Measure Ingredient -- Preparation Method

-------- ------------ --------------------------------


2 teaspoons canola oil

3/4 teaspoon ground cardamom

1/4 teaspoon ground cloves

3 large garlic cloves -- minced

7 ounces finely chopped onion

3/4 teaspoon chili powder

1/2 teaspoon turmeric

1 teaspoon ground coriander

1 teaspoon ground cumin

1/2 teaspoon ground chipotle pepper

9 ounces chickpeas -- cooked (or use a 15-ounce can, drained and rinsed)

12 ounces boneless skinless chicken breast -- diced into 1/2" pieces

3/4 cup low sodium chicken broth

3/4 cup water

1/2 cup light coconut milk

1/2 cup skim milk

1 tablespoon minced fresh lemongrass -- optional

14 1/2 ounces canned diced tomato -- undrained

8 ounces white potato -- diced 1/2"

2 cups frozen green beans -- (or fresh, cut into 1/2" lengths)

1/2 teaspoon coconut extract

1/4 cup chopped fresh cilantro


In a nonstick Dutch oven, heat the oil over a medium-high flame. Add the cardamom, cloves, and garlic and stir for 30 seconds. Add the onion, turn the heat down a little, and sauté for 6 minutes or until onions are just tender.


Add the chili powder, turmeric, coriander, cumin, and chipotle pepper and stir for 30 seconds. Add the chickpeas and chicken, stir to mix; then add the next 7 ingredients (chicken broth through canned tomato). Mix well and add the potato. Bring to a boil, turn the heat down to simmer, cover, and cook until potato is almost done (about 20 minutes).


Add the green beans and cook for 5 minutes (8 minutes for fresh green beans). Stir in coconut extract and ladle into serving bowls. Sprinkle with chopped cilantro.


Yield:

"8 cups"


- - - - - - - - - - - - - - - - - - -

Per serving: 499 Calories (kcal); 9g Total Fat (2g Saturated); (16% calories from fat); 40g Protein; 68g Carbohydrate; 50mg Cholesterol; 623mg Sodium

Food Exchanges: 3 Grain(Starch); 3 1/2 Lean Meat; 2 1/2 Vegetable; 0 Fruit; 1 Fat; 0 Other Carbohydrates