





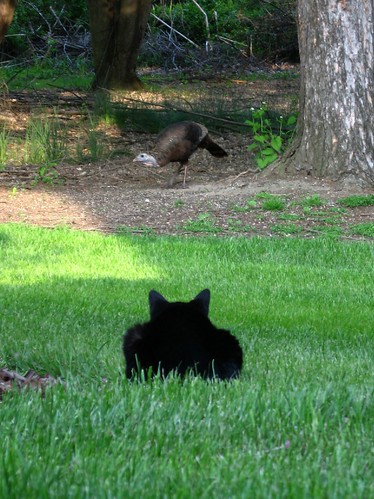
To expand more on my "turkey post", I took this today of Spooky watching our new yard-friend...
Somehow, I don't think that they will become buddies!
Tuesday, May 6, 2008
Saturday, May 3, 2008
Turkey Lurkey?
Well, I guess it was inevitable. Fifteen years ago, Jack and I stopped eating red meat (beef, pork, lamb, etc.) and haven’t missed it much (after the first year or so, anyway). We are now considering giving up turkey. As he said “one step closer to total vegetarianism”. Why, you may ask, are we pondering this additional change to our diets?
 Here he is:
It would be stretching it a bit to call him “cute”, but there is a certain appealing way he struts into the yard when I fill the birdfeeders, waiting until I step back onto the patio before running under the feeders where I have “accidentally” spilled some extra seed. I don’t know what he does with his days, but whenever I fill the feeders he is around somewhere. One of the feeders makes a scratching noise as I screw off the top, and Jack thinks that is what attracts the turkey.
Yesterday, as Jack mowed the lawn, the turkey wasn’t fazed at all. He was eating, that large noisy John Deere be damned!
Spooky doesn’t know what to make of this large bird. He will sit, tail twitching, and watch the turkey graze.
So as we watched the big ol’ bird this morning, Jack mentioned that he has started to feel badly about eating turkey now. I agreed, but I wonder what we will do at Thanksgiving. :)
Creamy Avocado Dressing
Recipe: Creamy Avocado Dressing
How could I not be inspired by this fabulous head of butter lettuce and bunch of Easter Egg radishes?

On my friend Jenni’s recommendation, I picked up a bag of mixed pepitas, pine nuts, and slivered almonds at Trader Joe’s. I then found these wonderful salad fixings in the organic section of a nearby food co-op, and just had to make a gorgeous spring salad. I had made a creamy avocado salad dressing the previous day, and it was the perfect touch.

I developed this salad dressing because I had one extremely ripe avocado which needed to be used immediately. Dinner was already planned, and precluded adding anything made of avocado to it. So I mixed up the dressing, using plain fat-free yogurt for creaminess, pressed plastic wrap on the surface and, lo and behold, it stayed nice in the refrigerator for 5 days.
Maybe I will subsequently experiment with different seasonings (cumin comes to mind, or powdered chipotle to make a more “zingy” dressing for topping fish) but for now I leave it as is because the taste of the avocado really shines through.
Creamy Avocado Dressing
Recipe By: Vicci
Servings: 6
Amount Measure Ingredient -- Preparation Method
---------- ---------- --------------------------------
1 tablespoon fresh lime juice
1 1/2 teaspoons minced garlic -- increase to 2 teaspoons for a real garlicky punch!
6 ounces avocado -- chopped (approximately an 8-ounce avocado minus pit and peel)
1/2 cup plain nonfat yogurt
2 tablespoons (or more) skim milk
1/4 teaspoon salt
1/8 teaspoon ground white pepper
In a blender or small food processor, process all of the ingredients until creamy. Taste and adjust for seasonings. Add more skim milk if a thinner texture is desired.
If not using immediately, this will keep, in a tightly-covered glass container, for 3 or 4 days. "Fruit Fresh" can be added (about 1/2 teaspoon) to prevent darkening.- - - - - - - - - - - - - - - - - - -
Per serving: 46 Calories (kcal); 3g Total Fat (1g saturated); (59% calories from fat); 2g Protein; 3g Carbohydrate; trace Cholesterol; 106mg Sodium
Food Exchanges: 0 Grain(Starch); 0 Lean Meat; 0 Vegetable; 0 Fruit; 1/2 Fat; 0 Other Carbohydrates
Wednesday, April 30, 2008
Turmeric Chicken with Coconut Milk and Asparagus
Recipe: Turmeric Chicken with Coconut Milk and Asparagus
Okay, guess what the pervasive fragrance in our house is these days?

Last year we had a period of very warm weather at the end of March and the lilac bushes began to open their buds, but when it snowed and the winter winds returned during the first part of April they froze and fell off. Last year, this tree gave me just a few lilacs.
I think that Mother Nature is trying to make up this year!
Twenty-four years ago I planted this shrub. It was the first year in our “new old house”, and I just had to have a lilac bush. The scent of lilac has always reminded me of my Gram, who had a huge bush in her yard. I have photos of me, as a baby, sitting under it and also several photos of Gram standing beside it.
To me, smelling lilac is almost like having my wonderful, dreadfully-missed Gram back with me.
All of the spring-flowering trees and shrubs and bulbs have hit their peak now. The yard is awash in white, lavender, scarlet, burgundy, pink, and lime-gold. It’s breathtaking.
Alas the weeds are also flourishing, and although I’ve tried to keep up it really is impossible. Today I will go to Lowe’s and buy a 2-gallon jug of Roundup concentrate, which should make the job easier on the large planting areas in front of the house. I dread to find out how much it will cost. It has been 2 or 3 years since we bought the last jug and I’m sure that, along with everything else, the price has jumped.
In the last week, I have been harvesting about a half pound of asparagus from the garden every day. I never did like asparagus much, but shortly after we moved into the farm we were visiting my parents and my Dad was showing me his garden. He had planted an asparagus patch a few years earlier and as we went by he snapped off two spears and handed one to me. I really didn’t want it, but I always try to play The Good Daughter as often as I can, so I ate it. Then went back for another, and another. Wow, what a different taste from the store-bought asparagus! Straight from the garden, asparagus has a nice, sweet taste that is quite unlike its straight-from-the-produce-aisle cousin. The following year I planted my own asparagus patch and had to wait for a few years for the plants to become established but we eventually were harvesting a pound or so every day.
I amassed quite the collection of asparagus recipes!
As expected, the asparagus lost its vigorous growth several years ago and I replanted new roots. These matured and are probably 3 or 4 years from needing to be replaced again.
Yesterday’s harvest:

One of my favorite recipes for using the garden asparagus is for pasta primavera, which I don’t have a recipe for, just sautéing vegetables and adding a little lowfat half-and-half for creaminess, then serving over whole wheat fettuccine.
Dinner last night was a Thai-inspired Turmeric Chicken with Asparagus over Rice Noodles.
This is one of my favorite asparagus-containing dishes, although the mix of flavors hides the taste of the asparagus somewhat (so I use store-bought asparagus in the recipe quite often). I adore Thai food and this is the epitome of everything I enjoy in that cuisine—lemongrass, coconut, spices… all covering pieces of asparagus and chicken and soft rice noodles. I have to restrain myself from eating it too quickly!
I hesitate to post the photo because it’s a bit bland, although if I hadn’t forgotten to sprinkle the cilantro on it, it would have looked better. To be honest, I was proud of myself that I actually remembered to add the coconut extract at the end of the cooking time because I often leave out that step. So I forgot the cilantro. So goes my brain. This is delicious, much more so that the photograph depicts.

* Exported from MasterCook *
Turmeric Chicken with Coconut Milk and Asparagus
Recipe By: Vicci
Servings: 2
Amount Measure Ingredient -- Preparation Method
---------- ---------- ---------------------------------------
5 ounces rice noodles -- wide, similar to fettucine
2 teaspoons fish sauce
1 1/2 teaspoons soy sauce
1 teaspoon brown sugar
1/2 teaspoon chili garlic sauce
1 teaspoon ground turmeric
1 tablespoon canola oil
8 ounces boneless skinless chicken breast -- sliced into 1/4" wide pieces
1 large garlic clove -- minced
1 small onion -- sliced vertically
1 large lemongrass stalk -- finely mince the white part of bulb only (about 2 tablespoons)
8 ounces asparagus -- ends trimmed, cut into 2" long pieces (split the thick pieces)
1/4 cup light coconut milk
1/2 cup fat-free half and half
1/2 teaspoon coconut extract
2 tablespoons chopped peanuts
1/2 large lime -- cut in half; for serving
Prepare rice noodles according to directions. Drain, soak in cool water to prevent sticking. Set aside.
Mix the fish sauce through ground turmeric in a small cup. Set aside.
Heat wok over a high flame. Drizzle in the canola oil, tilt the wok to distribute the oil evenly; add the chicken. Stir-fry for 30 seconds, then add the garlic, onion, and lemongrass. Stir fry for 2 minutes, or until chicken is opaque. Add the asparagus and stir for another minute. Add 1/4 cup of water and stir to get the browned bits from the bottom of the pan.
Turn the heat down to medium; add coconut milk and fat-free half and half. Bring just to a simmer*, add the soy sauce mixture. Cover and turn heat down to maintain a very gentle simmer. Cook for 2-3 minutes, or until asparagus is just tender. Sprinkle coconut extract over and stir in.
Serve in shallow bowls. Sprinkle with peanuts. Serve with lime wedges to squeeze over all.
*simmer, simmer, simmer, simmer! :) As I have mentioned before, both the fat-free and the lowfat half-and-half will separate if they come to a boil so watch it carefully!
- - - - - - - - - - - - - - - - - - -
Per serving: 601 Calories (kcal); 15g Total Fat (2g saturated); (22% calories from fat); 34g Protein; 82g Carbohydrate; 66mg Cholesterol; 679mg Sodium
Food Exchanges: 4 Grain(Starch); 4 Lean Meat; 1 1/2 Vegetable; 0 Fruit; 23 Fat; 1/2 Other Carbohydrates
Monday, April 28, 2008
Southwestern "Bruschetta"
Recipe: Southwestern "Bruschetta"
On Saturday evening we went to a party at the home of our friends Karla and Frankie. Another friend, Don, who moved way out west to Wyoming was visiting for a few days, so we used it as an excuse to get together. I enjoy going to Karla's house. It's a modern, clean design with a nice deck overlooking the river where we were able to sit and enjoy the unusually warm weather. The guests were fun, the food delicious, and the drink... strong. :)
Karla had a southwestern theme going, and I decided to make a variation on bruschetta as my contribution. I had found a recipe, but decided to go in a slightly different direction. This turned out to be very good. The bread was brushed with garlic oil and toasted on one side, topped with a mixture of avocado and tomato, sprinkled with cheese and cilantro.

* Exported from MasterCook *
Southwestern "Bruschetta"
Recipe By : Vicci
Serving Size : 20 (2 pieces)
Amount Measure Ingredient -- Preparation Method
-------- ------------ --------------------------------
1 whole French baguette -- about 15" long-- sliced into 40 3/8" thick rounds
3 tablespoons olive oil
2 large garlic cloves -- minced
1 1/2 cups chopped tomatoes
1/3 cup finely chopped onion
1/4 cup chopped cilantro
1 teaspoon Mexican oregano -- crumbled
1/2 teaspoon chipotle pepper powder -- optional
1 teaspoon kosher salt
2 medium avocados -- about 8 ounces each (before peeling and removing pit)
1/4 cup fresh lime juice
4 ounces Cotija cheese -- crumbled
2 tablespoons chopped cilantro -- optional
Preheat broiler.
In a small saucepan over low heat, saute the garlic in olive oil until very light brown. Remove from heat. Brush baguette slices with the garlic oil. Place under the broiler and broil until light brown (should take less than a minute-- watch carefully!). Remove to a rack to cool.
Toss the chopped tomatoes through salt in a medium bowl. Pour mixture into a wire strainer, set over a bowl, and drain at room temperature for 45 minutes to an hour. Peel and remove the pit from the avocados. Chop finely, place in a bowl, and toss with lime juice. Allow to stand for 5 minutes, tossing once or twice. Pour the avocado mixture into another wire strainer and drain for 15 minutes. Mix both tomato mixture and avocado mixture together. If not using immediately, cover and refrigerate for up to 2 hours. Allow to come to room temperature before using.
To assemble, top each baguette slice with a scant tablespoon of the tomato/avocado mixture. Arrange on a serving plate and sprinkle crumbled cotija cheese over all. Sprinkle with additional chopped cilantro, if desired.
- - - - - - - - - - - - - - - - - - -
Per serving: 72 Calories (kcal); 7g Total Fat (2g saturated); (76% calories from fat); 2g Protein; 3g Carbohydrate; 5mg Cholesterol; 138mg Sodium
Food Exchanges: 0 Grain(Starch); 0 Lean Meat; 0 Vegetable; 0 Fruit; 1 Fat; 0 Other Carbohydrates
The tomatoes are thoroughly drained so the bread will not get soggy, and if you make the topping ahead of time you may want to store it (for no longer than a couple of hours or the avocado, despite the lime juice, may begin to brown a little) in a container with a few layers of paper towels at the bottom to absorb excess moisture. Also, the bread can be toasted ahead of time-- just cool and tightly wrap in plastic.
On a totally different line, here is what is poking up between the patio stones:
Don't they have the most adorable little faces? :)
Tuesday, April 22, 2008
Tilapia with Thai Curry Sauce
Recipe: Tilapia with Thai Curry Sauce
In 1958, a person living in the United States had a life expectancy of 69.6 years. The average new home cost just a shade under $12,000, tuition at Harvard was $1,000 per year, eggs were 28¢ a dozen, and gasoline went for 24¢ a gallon. And I was born. Fifty years ago.
I know that I can’t turn the clock back, and there’s really nothing that I can do about it, so I’ve tried not be all gloomy and maudlin. For the most part, unless I start thinking too much, I’ve been able to handle it in a fairly sane manner. No gnashing of teeth or wailing inconsolably for me, I just have to deal with it.
Jack knows that I am terrified to be the center of attention so he quickly turned away any suggestions of a big celebration which were given by well-meaning friends and relatives. Instead, he planned a wonderfully quiet few days which were shared by the two people who were there with me those 50 years ago, my parents. They surprised me by showing up at our lake house, we went out to eat, and talked and laughed and enjoyed each others’ company. My parents went through some old slides of my first 7 years, made them into prints, and put them together in a book. These were photos with pictures I am unfamiliar with (because as much as we look through old photo albums, we never get the old Kodak carousel out for a spin), wonderfully hilarious photos, and a perfect way to celebrate my birthday. We went out to eat 3 meals in a row (unheard of, really, since I am usually not very happy with restaurant food but, this time, there was not a single complaint). Mom made me a chocolate-raspberry cake, Dad decorated it, and it was delicious. All in all, it was a very enjoyable weekend.
We planned to return back to the farm on Monday, but decided to stretch it out until Tuesday. We returned several hours ago. I unpacked and, upon seeing some ready-to-harvest asparagus in the garden, planned to make a simple pasta primavera for dinner. Now I have some spare time and since I haven’t posted here in nearly a week I should do so. I did make a great pizza crust on Sunday for dinner (a 10-hour rather than an 18-hour no-knead crust), but I need to refine it a bit more so it will be a future post. Breakfast this morning was lowfat vanilla scones with strawberries, but the ingredients are still written on a scrap of paper so that also will be a future post. Going backward… dinner last Wednesday night was terrific, although I didn’t have time to write about it. Until now!
I love tilapia. It’s a very mild fish which readily absorbs flavors and has a soft-but-slightly-firm texture that we enjoy. I had some coconut milk and spinach to use up, and cilantro, so I broiled the tilapia, served it over spinach-rice, and covered all with a Thai style coconut-curry sauce.
This was soooooo good.
I normally use basmati rice with Thai dishes, but I was too lazy to go to the basement pantry to refill the kitchen rice jar from the 25-pound bag, so I used parboiled rice. I think that this type of rice, which is sturdier and chewier than the delicate basmati is, was perfect for the bold flavor of the sauce. The tilapia also has a delicate texture, so I believe that the basmati rice might have made this dish texturally too “soft”.
The sauce is a mixture of light coconut milk blended with lowfat half-and-half (coconut extract is added just before serving to really punch up the coconut flavor), sautéed vegetables, both curry powder and curry paste, soy sauce, and brown sugar. Its bright gold-yellow color comes from the Penzey’s sweet curry powder which I used, and looked great with the sprinkling of dark green cilantro on top. A squeeze of lime over top, and you will swoon. We did.
* Exported from MasterCook
Tilapia with Thai Curry Sauce
Recipe By: Vicci
Servings: 2
Amount Measure Ingredient -- Preparation Method
---------- ---------- ----------------------------------------
2/3 cup parboiled rice
3 ounces baby spinach -- steamed, cooled, squeezed (or use frozen, thawed, squeezed chopped
spinach)
1/2 cup light coconut milk -- divided
1/2 cup lowfat half & half
1/2 tablespoon brown sugar
2 teaspoons low sodium soy sauce
1 teaspoon sweet curry powder
3/4 teaspoon red curry paste
1/2 teaspoon cumin
1/2 teaspoon cornstarch
1/2 teaspoon canola oil
2 1/2 ounces bell pepper -- colored preferred; finely chopped (about 3/4 cup)
2 ounces sweet onion -- finely chopped (about 1/2 cup)
1 tablespoon minced garlic
2 teaspoons minced ginger
3/4 teaspoon coconut extract
10 ounces tilapia
1 tablespoon chopped cilantro
1/2 large lime -- cut into 2 wedges
Cook the rice according to package directions, omitting fat and salt. While the rice steams, prepare the spinach. When the rice is tender and the water has evaporated, drizzle 2 tablespoons of the light coconut milk over the rice, stir, add the spinach, and stir gently until mixed. Cover to keep warm.
Mix the first 8 ingredients (the remaining light coconut milk through cornstarch) in a small bowl until smooth. Set aside.
Drizzle the olive oil in a small nonstick saucepan and heat over a medium flame. Add bell pepper and onion and cook, stirring often, for 3 minutes. Add garlic and ginger and cook for an additional minute. Give the coconut milk mixture a stir (the cornstarch probably settled to the bottom) and add to the vegetables. Continue to cook over a low flame until the mixture begins to simmer. Remember that the lowfat half and half will separate if the sauce comes to a boil (it will not spoil the taste of the dish, but it won't be pretty). Stir as it thickens a bit then turn the heat as low as possible. Continue to barely simmer and stir often for 5 minutes. Remove from heat and stir in the coconut extract.
Preheat a skillet or broiler and cook the tilapia until done.
Divide the rice between 2 large plates, topping with the cooked tilapia. Pour sauce over, sprinkle with cilantro, and serve with lime wedges.
- - - - - - - - - - - - - - - - - - -
Per serving: 216 Calories (kcal); 8g Total Fat (4g saturated); (31% calories from fat); 7g Protein; 31g Carbohydrate; 10mg Cholesterol; 285mg Sodium
Food Exchanges: 1 Grain(Starch); 0 Lean Meat; 1 1/2 Vegetable; 1/2 Fruit; 4 Fat; 0 Other Carbohydrates
NOTES : This has a long list of ingredients, but the sauce (or only the ingredients, if preferred) can be prepared ahead of time and refrigerated.
The coconut milk is supplemented with lowfat half and half which drastically cuts the fat and calories. Because the coconut flavor is desired, adding the extract at the end of the sauce's cooking time will ensure that it doesn't get "cooked away".
Wednesday, April 16, 2008
No Knead Pizza Crust
Recipe: No Knead Pizza Crust
Look! Two posts in one day!! :)
I have recently received 2 requests to please publish the no-knead pizza dough recipe which I mentioned in a late-February post. I always do what I'm told.
haha
Anyway, this dough takes about 21 hours from start to when you can add toppings. Yes, the tradeoff to not kneading is the waiting! But time allows the gluten to develop slowly, giving this dough an incredible texture and flavor. Be patient. It will be worth the wait.
The recipe makes a rather thick 15" crust. If you like thin crusts on your pizza, roll it out to be larger, or divide the dough into two pieces.
I love crust (of course, since I love bread!) and always make a nice, thick crust around the perimeter. After a few pieces, Jack will usually save his crusts for me, preferring to eat the rest before filling up too much. It's a symbiotic relationship we have in that way-- he prefers the actual toppings, I slog through the toppings to get to the crust! So we trade...
The pizza above is Jack's favorite Thai Chicken Pizza and soon I will remember to write down the sauce ingredients so I can post this recipe as well.
* Exported from MasterCook *
No Knead Pizza Crust
Recipe By: Vicci
Servings: 4
Amount Measure Ingredient -- Preparation Method
-------- ------------ --------------------------------
2 1/4 cups all-purpose flour
1/4 teaspooon active dry yeast
1/2 teaspoon salt
8 ounces lukewarm water
In a medium bowl, mix the dry ingredients thoroughly. Add the water and mix with a wooden spoon until the flour is no longer visible and is incorporated into the dough. This may take a little time and effort. Flour your hands well and play with (knead) the dough for about 30 seconds (you won't be actually "kneading it" in the traditional way, just moving the dough around a bit with your hands to ensure a thorough mixing). The dough is quite sticky.
Place the dough in a medium bowl (no need to oil or prepare the bowl). Cover with plastic wrap and allow to rise is a coolish place (about 65-68F) for 18-19 hours.
Sprinkle the dough with 2 tablespoons of flour and "knead" it again (keeping your hands well-floured), making certain that the flour is totally incorporated into the dough. Place in another medium bowl, cover with the same plastic wrap, and allow to rise in a cool area for 2 additional hours.
Prepare a pizza sheet by spraying it well with cooking spray. Lift the pizza dough onto the sheet and deflate it further. Sprinkle some flour on top and form into a 15" diameter crust. Cover again with plastic and allow to rise in a warm place for 30 minutes.
Preheat oven to 450-475F. Remove plastic from crust and add toppings to pizza; place in the oven. Bake for 7 minutes, turn sheet 180 degrees, and bake for another 2-3 minutes or until bottom of the crust is lightly browned.
Start to Finish Time:
"21:00"
- - - - - - - - - - - - - - - - - - -
Per serving: 257 Calories (kcal); 1g Total Fat; (2% calories from fat); 7g Protein; 54g Carbohydrate; 0mg Cholesterol; 268mg Sodium
Food Exchanges: 3 1/2 Grain(Starch); 0 Lean Meat; 0 Vegetable; 0 Fruit; 0 Fat; 0 Other Carbohydrates
Subscribe to:
Posts (Atom)
