Tuesday, March 23, 2010

Strawberry Balsamic Chicken with Feta

About 20 years ago, I decided that we should stop eating red meat. I had become more concerned about what Jack and I ate, and was reading various books and magazine articles about the benefits of healthy eating. Here’s the funny part—I was interested in this subject because I was getting older--- 30! :) Imagine...


In any case, we stopped eating red meat. It was difficult at first, and we occasionally “cheated” with a grilled hamburger at a picnic, or pot roast for Sunday dinner, but as we continued it became easier and easier to concentrate on eating more fish and poultry instead of any beef at all. In fact, a couple of years into this, we went out to dinner and Jack’s mouth started to water when our dining companions kept raving about the melt-in-your-mouth prime rib at this restaurant. So he ordered it and ate less than half of his meal, telling everyone that he was full and that it was a huge portion. Yes, it was, but the problem actually was that, to him, the meat tasted heavy and greasy. And he did not feel well for two days afterward (we gave the remaining meat in our “doggie bag” to our dog, who was incredibly grateful!). A few years after that, in autumn, I was craving pot roast. Made with carrots and mashed potatoes and gravy, I just could not get it out of my head. So I bought a piece of meat (I actually had to go online to find out the best cut since it had been so long), and prepared it. It was absolutely delicious and we dug in. Oh my, neither of us felt well for a couple of days afterward. I was bloated and felt sluggish and was a little depressed—the pot roast was so good!


That ended our occasional attempts at eating red meat. We were simply not "used to it" any longer.


An article in Nutrition Action (a health newsletter published by the Center for Science in the Public Interest) in June 2009 only confirmed the reason why I omitted red meat from our diet. A joint study by the NIH and the AARP followed the diets of over a half-million people over a period of 10 years (through questionnaires). The results indicated that, within this 10 year period, those who ate the most red meat (about 5 ounces of red meat a day in a 2,000 calorie per day diet as opposed to those in the low end, who ate about 2/3 ounce of red meat per day on average) were roughly 30% more likely to die, and this was mostly the result of heart disease or cancer.

The entire study is fascinating. I didn’t know this when we started our red meat-less diet, but if we could possibly avoid, or reduce our risk of, heart disease and cancer (especially colorectal, but also prostrate and pancreatic), simply by eliminating red meat from our diet, well, why not? There are plenty of other food options out there!


Most recipes which call for beef or pork can be adapted to use chicken or turkey. Some are easier than others. For example, the following recipe was originally published in CuisineLite as Balsamic Steak with Fruit and Gorgonzola. All I did was to sub grilled chicken breast for the pan-fried tenderloin fillets and use reduced-fat feta cheese for the gorgonzola. One of my favorite summer salads contains grilled chicken, feta, and fresh strawberries, so I knew that this combination would be great. And it was quite good. Jack said that it was excellent.


This is such a quick recipe. Grill the chicken while you make the sauce and slice the strawberries—it couldn’t be easier. I wanted to serve Trader Joe’s Brown Rice Medley as a side, so that was started first (it takes 45 minutes to cook), and I also made green beans sautéed with garlic and finished with a squeeze of lemon juice.


* Exported from MasterCook *


Strawberry Balsamic Chicken with Feta


Servings : 2


Amount Measure Ingredient -- Preparation Method

-------- ------------ --------------------------------

12 ounces boneless skinless chicken breast -- (2 pieces)

1/2 teaspoon freshly ground black pepper

1/3 cup balsamic vinegar

1 tablespoon strawberry jam -- (rounded)

1/2 teaspoon kosher salt

1/3 cup sliced strawberries

2 tablespoons reduced fat feta cheese -- crumbled


Preheat grill. Spray chicken breasts with cooking spray and sprinkle with pepper. Cook until done.


While chicken cooks, pour vinegar into a small saucepan. Heat over a medium flame until it is reduced and thickened, about 4 minutes. Whisk in the jam and set aside.


Place chicken on serving dish, sprinkle with salt, brush with balsamic glaze. Sprinkle strawberries and feta over top, drizzle with remaining glaze.


Source:

"adapted from CuisineLite"


- - - - - - - - - - - - - - - - - - -

Per serving: 259 Calories (kcal); 4g Total Fat; (15% calories from fat); 43g Protein; 11g Carbohydrate; 104mg Cholesterol; 791mg Sodium

Food Exchanges: 0 Grain(Starch); 5 1/2 Lean Meat; 0 Vegetable; 1/2 Fruit; 0 Fat; 1/2 Other Carbohydrates

Wednesday, March 17, 2010

Lacquered Chicken with Spicy Ginger Sauce

Both Jack and I love spicy food. He apparently has a higher heat-tolerance than I do because often I will make a recipe and find myself almost unable to eat it while he will wipe his face with his napkin, grin, and proclaim “this is nice and spicy!”.


Seriously, I’m not a weenie about spice. A friend once thinly sliced some of his home-grown Scotch bonnet peppers, and placed a sliver on a cheddar-topped cracker. It was hot, very hot, searingly hot, but the delicious flavor combination was irresistible. I ate several (and drank a lot of cold beer). Those, my husband deemed to be too spicy for his taste. Go figure.


I recently prepared a Cuisine at Home recipe which tested both of our spice limits. Lacquered Short Ribs with Spicy Ginger Glaze was altered and became Lacquered Chicken (because we do not eat beef). It was changed from a crockpot recipe to a non-crockpot recipe. And the spice level of the glaze was toned down dramatically (though, apparently, not quite enough!).


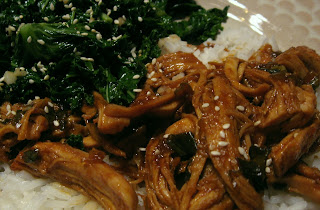
I knew that it would be trouble when I read that one of the ingredients for the glaze, to serve 4, was ¼ cup of Sriracha sauce. So I reduced it to 2 tablespoons and that really pushed my spice limit. But Jack said that it was perfect although maybe a little too spicy. In fact, be both were so impressed with the flavor of the glaze that I plan to make it in quantity, with less Sriracha—the stuff will be awesome on grilled chicken. And, in addition to serving it over steamed rice as I did, this would be excellent served as a sandwich on a hearty whole-grain roll.

\

This was a really quick recipe since I was using poached chicken breasts instead of cooking short ribs in the glaze in a crockpot. Any kind of precooked, shredded chicken can be used (such as rotisserie chicken bought at a grocery store). This is my version of the Cuisine at Home recipe:


Lacquered Chicken with Spicy Ginger Sauce

Serves 2


10 ounces boneless, skinless chicken breast

For the spicy ginger sauce-
1/4 cup chopped scallions
1-1/2 tablespoons minced fresh gingerroot
1 tablespoon packed brown sugar
2 tablespoons rice vinegar
1 tablespoon Sriracha sauce (or more, if you can handle it!)
2 tablespoons molasses
2 tablespoons hoisin sauce
2 tablespoons fresh lime juice

1 tablespoon reserved poaching liquid (or water)


Poach chicken in water to cover, adding some onion, celery, carrot, and peppercorns to flavor broth. When almost cooked, turn off heat and cover. Cool in pot for 15 minutes, remove lid and continue to cool for another 15 minutes. Remove chicken to a cutting board. Strain the poaching liquid into a container for later use.

Combine scallions, gingerroot, brown sugar, vinegar, Sriracha sauce, molasses, hoisin sauce, lime juice, and poaching liquid or water in a medium saucepan. Bring to a boil; reduce heat, cover, and simmer on very low for 15-30 minutes, stirring occasionally.


Meanwhile, shred chicken.


When sauce is cooked down a bit and thickened, add the chicken shreds, mix well, and cook, covered, for 15-30 minutes occasionally (stir often and add additional broth/water if the sauce becomes too thick and starts to stick to the pan).

Serve over rice.

Wednesday, February 17, 2010

Spicy Garlic Chicken with Lemon Glaze

I’ve been away from blog-land for a while. The first week of this month was spent visiting my parents, then we returned to the farm to a very cold house. Because of a snowstorm, our electricity had been out for four days and the downstairs rooms were at about 45 degrees, the upstairs around 38 degrees. I’ve always (good-naturedly, mostly) complained about how cold our old farmhouse is in the winter, but I never will again after recently walking through rooms and seeing my breath!


Of course, frozen pipes were my main concern. We have 2 small electric fireplaces on the main level which we would turn on for a few hours a day, but this would only result in the temperature rising a few degrees. It was enough, I guess, because the water pipes never froze.


Oh, I should mention that since my MIL is visiting her daughter, Jack and I were able to use her apartment for three days. Unfortunately, the complex does not allow pets, so we had to sneak Spooky in and out (we couldn’t leave him there alone or he would give himself away to the neighbors!). Luckily, the apartment is on the first floor, with a door right next to the reserved parking space, so it wasn’t too difficult.


It has snowed every darn day since we returned—8 days! We felt, at times, as though we were taking our lives into our hands as we drove the hilly roads to the farm and back to our “temporary home”. Because we both work from home, there is never a need to leave during bad weather. We stay put. So this experience was especially nerve-wracking!


I am proud to say that we lost almost nothing from either of the refrigerator/freezers or from the big freezer. The day we returned, we took everything that was in the refrigerators, boxed it all up, and put the boxes on our enclosed porch. We also took the frozen items from those units and packed them, with ice packs, into coolers and stored these in the (unheated) smokehouse. The next day, Jack emptied recyclables from a clean, 55-gallon trash can, and we layered everything from the big freezer with snow, then buried the can in a snowdrift. Had this long of a power outage (6+ days) taken place any time other than January or February, when there was enough snow on the ground to bury our “Eskimo freezers”, we would have lost everything.


The absolute joy of being back in my own home, cooking in my own kitchen, is incredible. Unfortunately, because we have been doing a lot of shoveling, both Jack and I have been experiencing some very sore muscles over the past few days. Yesterday, though, we took a break and last night I felt well enough to actually cook a meal.


Not that we haven’t been eating. After I cleaned out the big freezer and took and inventory of everything I was putting in there, I found several meals which I had frozen last fall and promptly forgotten about. So these got us through 4 dinners.


Yesterday, I made the first (of many more to come) recipes from my new cookbook, CuisineLite. There were so many positive reviews of this publication on the Cuisine At Home forums that I had a difficult time choosing. Based on what I had on hand, I chose Spicy Garlic Chicken with Lemon Glaze.


I altered the recipe only slightly. I increased the size of the chicken breasts, used a different kind of hot sauce, and increased the panko crumbs a little. Also, even though I decreased the amount of chicken (because the recipe made 4 servings), I kept everything else the same. These changes are reflected in the recipe below.


This was a great meal! I never realized how wonderfully the flavor of lemon went with some sort of spice (in my case, habanero pepper sauce). The chicken was crunchy outside, tender inside, and that delicious glaze added just the right amount of flavor. I started some fingerling potatoes roasting in the toaster oven first, then started the rest of the meal a little later. It took less than 30 minutes to get the chicken prepared and on the table (including steaming the broccoli). This recipe will become a staple for us.


* Exported from MasterCook *

Spicy Garlic Chicken with Lemon Glaze

adapted from Cuisine Lite, a publication of August Home Publishing
Servings: 2


Amount Measure Ingredient -- Preparation Method
-------- ------------ --------------------------------

12 ounces boneless skinless chicken breast halves – (2 pieces)
1/4 teaspoon kosher salt
1/8 teaspoon ground black pepper
1/3 cup panko
2 teaspoons minced garlic
1/4 teaspoon dried oregano
2 tablespoons fresh lemon juice
2 tablespoons honey
1/2 teaspoon habanero pepper sauce
1 teaspoon grated lemon rind
2 teaspoons extra-virgin olive oil


Combine lemon juice, honey, Tabasco, and lemon rind for the glaze in a small bowl and set aside.

Season the chicken with salt and pepper. Stir together panko, garlic, and oregano in a large dish. Dredge both sides of chicken in panko mixture, pressing panko firmly into the chicken..

Heat oil in a large nonstick skillet over medium heat. Add chicken; sauté until cooked through, about 12 minutes (to 160 degrees internal temperature). Remove chicken from skillet.

Add lemon-honey mixture to the skillet and reduce until syrupy (less than a minute).Return the chicken to the skillet, flipping the pieces once to coat with glaze. Serve.


- - - - - - - - - - - - - - - - - - -

Per serving: 329 Calories (kcal); 7g Total Fat; (18% calories from fat); 41g Protein; 26g Carbohydrate; 99mg Cholesterol; 390mg Sodium
Food Exchanges: 1/2 Grain(Starch); 5 1/2 Lean Meat; 0 Vegetable; 0 Fruit; 1 Fat; 1 Other Carbohydrates


Sunday, November 15, 2009

Chicken Blue Cheese Sandwich

It is mid-November and we are experiencing weather that I would like to have stick around until… next May. The sun is not as high in the sky as it has been for previous months and it isn’t nearly as warm, either, but just having the bright yellow orb in the sky is enough to make me happy.


There is still arugula growing in the cold frame and as I was picking some for a lunch salad, I thought of a sandwich that my friend Nancy had made when she visited the lake house a few months ago. I mentally clicked through the ingredients which I would need—blue cheese, chicken, fresh tomato…yes, I had them all. In fact, I only have a couple of tomatoes left from the garden and this would be a wonderful way to use one. Jack was out of town and I could make a sandwich with blue cheese and arugula without having to make him something else. I found an 8” piece of a baguette in the freezer and went to work.


I had a lot to do that day, and decided not to look up the Cooking Light recipe but to just “wing it”.


First I thawed a chicken breast, heated the grill, and cooked it. After it cooled a little, I sliced it diagonally.


In a small bowl, I mashed blue cheese, cream cheese, salt and pepper, and enough skim milk to make it

spreadable.

After splitting the baguette in half horizontally, I scooped some of the excess bread from the center of both halves (and yes, I ate it the "excess"—never waste good bread!). The blue cheese mixture was spread on both cut sides; on the bottom half I layered arugula, then the chicken slices, then the tomatoes.


Because it was such a gorgeous sunny day, and we hadn’t yet put away the tables on the patio, I ate outside. For 20 minutes or so I pretended that it was still summer.


The grilled chicken, blue cheese, bitter arugula, and sweet ripe tomato all combined to make an absolutely delicious sandwich.


A praying mantis sauntered across the table to see what I was doing. I offered him (her?) a bit of arugula but, perhaps like Jack, he doesn’t care for it.


(this happy little guy looks kind of cute when viewed as a small photo, but is slightly terrifying when placed on full-screen!)

Sunday, August 16, 2009

Greek Omelets, Purple Basil Parmesan Biscuits, Chicken and Roquefort Sandwiches

Yet another installment in my cooking extravaganza over the last weekend of July with my friends Jenni and Nancy.


For breakfast on Saturday, Jenni prepared Greek omelets (next to eating melted bittersweet chocolate out of a bowl with a spoon, this is my idea of heaven on earth). She used feta, kalamata olives, fresh oregano (also tomatoes? Jenni??? I can’t remember!). To accompany this eggy delight, she made purple basil-parmesan biscuits from Cooking Light. Jenni used Italian basil (not purple) from her garden, and subbed asiago for parmesan. She decided to cut the biscuits into squares instead of cutting out the traditional rounds, then re-rolling and re-cutting the dough scraps. Very smart, she is! These definitely did not taste like “light” biscuits, but they were. Tender and flaky, redolent with the aroma of asiago and basil, and delicious.


Purple Basil Parmesan Biscuits


Chopped purple basil flecks these biscuits with color. Standard sweet Italian basil would do, as well. For tender biscuits, stop cutting the butter into the dough when the mixture has pea-size nuggets.


9 ounces all-purpose flour (about 2 cups)
2 tablespoons sugar
4 teaspoons baking powder
1 teaspoon salt
1/4 cup chilled butter, cut into small pieces
2/3 cup chopped fresh purple basil
1/2 cup (2 ounces) finely grated Parmigiano-Reggiano cheese
2/3 cup fat-free milk
1 large egg
Cooking spray

1. Preheat oven to 425°.

2. Weigh or lightly spoon flour into dry measuring cups; level with a knife. Combine flour, sugar, baking powder, and salt in a medium bowl, stirring with a whisk. Cut in butter with a pastry blender or 2 knives until mixture resembles coarse meal. Stir in basil and cheese. Combine milk and egg in a small bowl, stirring with a whisk. Add milk mixture to flour mixture; stir just until moist. Turn dough out onto a floured surface; pat to 1-inch-thick circle. Cut with a 2-inch biscuit cutter into 12 biscuits. Place biscuits on a baking sheet coated with cooking spray. Bake at 425° for 15 minutes. Remove from oven, and cool.


Yield: 12 biscuits (serving size: 1 biscuit)

CALORIES 145 ; FAT 5.4g (sat 3.2g,mono 1.3g,poly 0.3g); CHOLESTEROL 31mg; CALCIUM 156mg; CARBOHYDRATE 19.5g; SODIUM 448mg; PROTEIN 4.6g; FIBER 0.7g; IRON 1.3mg

Cooking Light, JULY 2009


Okay, this is my plate. I chose a smaller biscuit because I was trying to “be good” but, alas, I returned for a second one…


The meal was rounded out with a mixed fruit salad courtesy of Nancy’s arm-numbing Chopping Detail.


I had never eaten fresh apricots before, and I’m hooked! Also included were honeydew, cantaloupe, peaches, pineapple, and blueberries. What summer is all about, right?!?!


Next up, lunch!

As her contribution to our cooking weekend, mentioned in previous posts, Nancy planned a picnic-on-the-boat with ­­­­­­­­­­­Chicken & Roquefort Sandwiches from the August issue of Cooking Light.


Holy cow, that sandwich was incredibly delicious! Again, not at all “light” tasting but flavorful enough that I finally stopped eating when I realized that I was in a swim suit and the material might not stretch enough if I had kept on going… ;)


The sandwiches were assembled in advance (grilled chicken, cheese mixture, arugula) and the tomatoes taken along to add just before serving. We ate more of that wonderful mixed fruit salad from breakfast, drank Jenni’s wine contribution to the weekend (a wonderfully chilly moscato), and well, with one thing or another (drinking rum, floating in the river on inflatable chairs, etc.), I neglected to take a single photo. The Cooking Light recipe (and their photograph) follows. And I must mention that the vegetarian in our group, neighbor Karla who kindly took us on her boat that day because I’m afraid to use our boat (don't ask, I'm a weenie..), loved the sandwiches sans chicken as well.


Chicken and Roquefort Sandwiches


One serving of this entrée contains about one-fourth of your daily sodium allotment. We extend salty Roquefort cheese by mixing it with cream cheese as a spread. A 2-ounce portion size for bread also helps control sodium counts.


1/2 cup (about 3 ounces) tub whipped cream cheese
1/4 cup (1 ounce) crumbled blue cheese
2 tablespoons finely chopped celery
1 1/2 teaspoons chopped fresh chives
2 teaspoons olive oil
2 (6-ounce) skinless, boneless chicken breasts
1/4 teaspoon coarsely ground black pepper
1/8 teaspoon salt
1 (8-ounce) baguette
2 small heirloom tomatoes, thinly sliced (about 8 ounces)
1/2 cup baby arugula leaves

1. Combine first 4 ingredients in a bowl.

2. Heat oil in a nonstick skillet over medium-high heat. Sprinkle chicken with pepper. Add chicken to pan; cook 5 minutes on each side or until chicken is done. Remove from heat; let stand 5 minutes. Cut lengthwise into 1/3-inch-thick strips. Sprinkle evenly with 1/8 teaspoon salt.

3. Cut baguette in half lengthwise. Spread cheese mixture over cut sides of baguette. Arrange chicken, tomato slices, and arugula evenly over bottom half of baguette; cover with top half. Cut crosswise into 4 equal pieces.


Yield: 4 servings (serving size: 1 sandwich)

CALORIES 392 ; FAT 15.8g (sat 7g,mono 5.2g,poly 1.2g); CHOLESTEROL 84mg; CALCIUM 100mg; CARBOHYDRATE 35.1g; SODIUM 640mg; PROTEIN 27.9g; FIBER 2.2g; IRON 3.1mg

Cooking Light, AUGUST 2009


Tuesday, June 23, 2009

Thai Lemongrass Chicken

As you all may realize by reading my posted recipes, Asian is one of my favorite cuisines. Particular favorites are Thai and Vietnamese foods, and to me summer just is not summer without copious amounts of Thai basil, mint, and cilantro on my entrées.

This is one of our favorite stir-fry recipes, and I can only make it in the summer when my herb garden overflows with mint, cilantro, and Thai basil. As it is doing right now.

Seriously, my mouth is watering just typing this recipe (finally, the handwritten, food-stained piece of paper will be sent to the recycling bin). The chicken is tender, the vegetables crisp, and the lemongrass sauce is seriously drool-worthy. If you don’t have fresh lemongrass, this can be made without it and is quite good, but for heavens’ sake do not use dried lemongrass. I’ve tried it. Flavorless and, well, it’s like munching on bits of straw.


* Exported from MasterCook *


Thai Lemongrass Chicken


Recipe By: Vicci

Servings: 2


Amount Measure Ingredient -- Preparation Method

-------- ------------ --------------------------------

10 ounces boneless skinless chicken breast

2 stalks lemongrass

3 whole scallions -- thinly sliced, white and green parts

1/4 teaspoon freshly ground black pepper

1/2 teaspoon kosher salt

1/3 cup low sodium chicken broth

1 teaspoon low sodium soy sauce

1 teaspoon fish sauce

1/2 teaspoon brown sugar

1/2 teaspoon minced garlic

1/4 teaspoon sambal oelek -- or other hot chili paste (I use ½ teaspoon)

3/4 teaspoon cornstarch

1 tablespoon canola oil

1 medium red bell pepper -- diced

1/2 medium onion -- diced

2 medium carrots -- sliced diagonally

1 tablespoon Thai basil -- chopped

1 tablespoon mint -- chopped

1 tablespoon cilantro -- chopped

1/2 medium lime


Cut the grassy part off of the top of the lemongrass and discard. Peel a layer or two of the outer part off and discard. You should be able to see, at the root end, the fibrous part where the roots were attached. Cut this off, and since you should be cutting into the more tender part of the bulb it should be easy, not tough. Slice the lemongrass very thinly going up the stalk until it starts to become difficult. Discard the rest of the stalk. Using the flat side of a large chef knife, bruise the lemongrass slices to release the fragrance. Place in a covered plastic or glass container that will be large enough to hold the chicken.


Cut the chicken breast into 1/2" dice and add to the lemongrass. Add the scallions, pepper, and salt; toss until well mixed, cover and refrigerate for 30 minutes.


Prepare the sauce by mixing the broth through the cornstarch. Set aside.


Heat a nonstick wok over medium-high heat. Drizzle in the oil then add the chicken mixture, stirring for 2 minutes.


Add the vegetables and continue to stir-fry until the carrots are almost tender (about 3 minutes). Add 1/4 cup of water and stir for a minute. Add the stock mixture and stir continuously until it comes to a boil and thickens.


Remove from heat and serve immediately over cooked rice. Sprinkle with desired herbs. Serve with lime wedges.


- - - - - - - - - - - - - - - - - - -

Per serving: 315 Calories (kcal); 9g Total Fat (1g Saturated); (26% calories from fat); 37g Protein; 21g Carbohydrate; 83mg Cholesterol; 759mg Sodium


Saturday, May 9, 2009

Turkey Tortilla Soup

So I was sitting here on the porch a couple of days ago, working on my laptop, and a movement outside caught my eye. I grabbed my camera, which was conveniently on the table beside the computer, and took this photo.


There have been a couple of turkeys hanging around the house lately. They hear the squeaking sound that the birdfeeder makes as I screw apart the top to refill it, and they come running out of the field. I’ll be weeding outside, hear a rustling and a “cluck-cluck” from the holly hedge, and know that I’m being watched. This amuses Jack considerably since the minute he steps outside they run, but I have to be careful that they don’t get too close to me. In their little beady turkey-eyes, I am the provider of meals. They like me.


It was raining, and I had not yet gone outside to refill the bird feeder on that day, and apparently one of the turkeys decided to remind me of my neglectfulness. Or stop by for a drink from the fish-pond. In either case, Spooky was not particularly happy since he considers himself the King of our farm and he has not given these interlopers permission to be here as well. He stares at them very fiercely. He hisses as they walk past. They do not care a bit.


I felt a little badly because in the kitchen, simmering on the stove, was a pot of turkey stock. I had roasted a large turkey breast a couple of days previously and had planned to make a turkey-veggie-rice soup on this rainy day. However, before I got the chance, I found a Cuisine At Home recipe which called to me.


Turkey Tortilla Soup.


I have made several versions of tortilla soup, both chicken and vegetarian, but this one was different and not just because of the turkey. Every other recipe I have made uses baked tortilla strips either as a garnish, or piled in the bowl with the soup ladled over it. This recipe used corn tortillas as a thickener, with no crunchy strips added.


And it used some cream (although we know that I substituted for that!) to make a creamy soup rather than a brothy one.


Now, as I mentioned, I made changes.


  • I subbed lowfat half & half for the heavy cream (and I whisked 1 tablespoon of cornstarch into it to thicken the soup even more)
  • Decreased the amount shredded cheese and "reassigned" it to being a garnish (rather than melting it into the soup)
  • Added avocado, tomato, and chopped fresh cilantro as a garnish.
  • I also (inadvertently) forgot about the sour cream. :)


This soup was so very good and it will now be our favorite tortilla soup. I’m thinking that I could add cooked black beans next time, but I will keep my garnish of tomato, avocado, and cilantro because those flavors really did well with the soup. And maybe I'll remember to add the (light) sour cream, too.


I used my immersion blender to puree the soup while still in the pot. I love my immersion blender, though I do not use it often. But it saves me having to clean the blender!


Turkey Tortilla Soup


2 T. olive oil
1 1/2 cups onion -- minced
2 T. garlic -- minced
3 corn tortillas (6 inch each) -- cut into 1 inch pieces
1 can diced tomatoes with green chilies (101/2 oz.)
4 cups chicken broth
1 t. ground cumin
1 t. ground coriander
1 t. dried oregano
1/2 t. cayenne


2 cups cooked turkey or chicken -- shredded or cubed
1 1/2 cups frozen corn kernels
1/2 cup heavy cream
1 cup Monterey Jack cheese -- shredded
2 T. fresh lime juice
Salt and pepper
Sour cream


Heat oil in a large saucepan over medium-high; add onions and garlic, and sauté 3 minutes. Stir in tortilla pieces and sauté until they are no longer crisp. Add tomatoes, broth, and spices, and bring to a boil. Remove from heat; let cool 5 minutes, then puree soup base in batches in a blender or food processor until smooth. Return soup to pot.


Add turkey, corn, and cream. Bring to a boil and simmer 5 minutes, or until beginning to thicken. Reduce heat to medium, sprinkle in cheese, and stir until melted. Add lime juice and season with salt and pepper to taste.


(Cuisine at Home, December 2005, Issue 54, p. 36)
Makes: 8 Cups


Thursday, May 7, 2009

Soft Chicken Tacos with Lime and Avocado

So many recipes, so little time…


For the past 3+ weeks, as I have been recovering from an asthma attack and have done only as much in the kitchen as I felt like doing, I nevertheless continued to peruse food sites and blogs. The result is a sheaf of recipes that I want to try, yet there are only so many meals in a day. I could pretend that we are on a cruise ship and serve 6 or 7 meals a day; but then both Jack and I would become quite round, and that is definitely not a good thing.


So I have a binder, my “to try” binder, where I place all recipes until I’ve tried them. It is very full now, and I have to start working from this. After I initially try a recipe, I will then write down my changes/ comments, and if there are a lot of them I will retype the recipe into MasterCook, and then file this recipe into one of my huge mega-binders. Unfortunately, the mega-binders become a final resting place for many recipes since there seem to be too many new ones that I want to try and I neglect to return to the favorites. I have to figure out how to remedy this (I did try making a list, but that didn’t work; any comments from those who read this are welcome!).


Tuesday, May 5, was Cinco de Mayo. An excuse for me to plan a Mexican meal, although I really don’t need an excuse.


As luck would have it, I was gone from 10am to 5pm on that day and thought that the recipe I chose would be easy to put together quickly. Well, it was, but I printed it from the AllRecipes website without reviewing it.

Now, I know that we eat healthier meals than many people, and it has become second nature for me to increase the veggies in a dish while decreasing the amount of meat and full-fat dairy. I forget about that sometimes, and when I arrived home and started to cook from the recipe for Lime Chicken Soft Tacos, I was reminded.


After saying “what’s this?” several times, I sat down with a pen and started to write in the numerous changes. The person who submitted this recipe said that it made 10 servings, but there was only one taco per serving, each containing 2-1/2 ounces of chicken, and 1-1/4 teaspoons each of shredded cheese, lettuce, and a single medium-sized chopped tomato divided between the 10 tortillas. This made absolutely no sense to me at all. There was also a procedural error where the recipe instructed to sauté the cubed chicken breast over high heat for 20 minutes. Chicken breast is very lean, and to sauté over high heat for such a long time will surely dry it out.


These tacos, as the recipe directs, are heavy on meat and way too light on vegetables. And only one taco would not satisfy me, let alone my husband. Even though it was getting late, I made some notations then started on my own version which, no big surprise, we enjoyed very much.


I used 8 ounces of chicken breast to divide between the tortillas, and used more lime juice than the recipe called for, plus added ground cumin and chili powder for more flavor. To the recipe I added additional cheese (not a lot, because I used queso fresco and it is not lowfat), tomato, onion, avocado, and lettuce. I also added light sour cream mixed with skim milk to add a creamy and smooth note to the spicy meat, this is similar to the Mexican crema.


The final result is a wonderfully delicious soft taco. The chicken has a decidedly lime-y taste, and all of the other flavors combine and will make your mouth very happy indeed. :)


Now, the recipe calls for 4 tortillas, although I actually used 5 (Jack had one more than I did) and we definitely had enough filling for the extra one. I also sautéed diced red bell pepper, then added frozen corn and edamame and a splash of lime juice for a side.


* Exported from MasterCook *


Soft Chicken Tacos with Lime and Avocado


Recipe By: Vicci

Servings: 2


Amount Measure Ingredient -- Preparation Method

-------- ------------ --------------------------------


4 whole corn tortillas -- heated until soft, per package directions, and placed in a

tortilla server or wrapped in a clean dish towel to keep warm

1 small tomato -- diced

1 cup shredded lettuce

2 ounces queso fresco -- crumbled (or sub shredded Monterey Jack)

1 large green onion -- thinly sliced diagonally

1/2 medium avocado -- chopped

2 tablespoons chopped fresh cilantro -- optional

3 tablespoons light sour cream

2 tablespoons skim milk


2 teaspoons olive oil

8 ounces boneless skinless chicken breast -- cut into 1/4" wide strips

2 tablespoons water

2 tablespoons fresh lime juice

3/4 teaspoon chili powder

1/2 teaspoon ground cumin

1/2 teaspoon brown sugar

1/4 teaspoon kosher salt

1/8 teaspoon powdered chipotle pepper -- optional

1/8 teaspoon freshly ground black pepper

1 large garlic clove -- minced


Prepare the tortillas and keep warm. Prepare the vegetables and cilantro and place in separate serving bowls. In another small serving bowl, stir the sour cream and skim milk until smooth. Set these aside.


In a medium nonstick skillet, heat the olive oil over medium heat. Sauté the chicken strips until they turn opaque and very lightly browned, about 6-7 minutes. While the chicken cooks, mix the water through minced garlic in a small cup. Add to the chicken and stir. Simmer for a few minutes until there is barely any liquid remaining.


Transfer chicken mixture to a covered serving dish. Place on the table along with the tortillas, vegetables, cilantro, and sour cream. Make your own!


- - - - - - - - - - - - - - - - - - -

Per serving: 445 Calories (kcal); 18g Total Fat (4g Saturated); (35% calories from fat); 36g Protein; 38g Carbohydrate; 77mg Cholesterol; 466mg Sodium

Sunday, April 5, 2009

Posole with Eye of the Goat Beans and Shredded Chicken

Not too surprisingly, since I was raised and still live in southwestern Pennsylvania and did not even taste a taco until I was a junior in college, I had not tried posole until this past winter. I saw a recipe, and it looked very interesting, but I had a difficult time locating hominy until I finally found it at… WalMart. This was canned hominy, and I posted about the Posole Rojo a month or two ago.


Since both Jack and I really enjoyed it, when I saw this recipe for Posole with Eye of the Goat Beans and Shredded Chicken, and it used dried hominy, I decided to give it a try.


But, first, from those (like myself) who are uncertain about what posole really is, a Wiki-definition:

Pozole (from Spanish pozole, from Nahuatl potzolli; variant spellings: posole, pozolé, pozolli) is a traditional pre-Columbian soup or stew from Mexico and New Mexico. It is made from hominy, with pork (or other meat), chili pepper, and other seasonings and garnish, such as cabbage, lettuce, oregano, cilantro, radish, avocado, lime juice, etc. There are a number of variations on pozole, including blanco (white or clear), verde (green), rojo (red), de frijol (with beans), and elopozole (sweet corn, squash, and chicken or pork meat).


Hominy itself is pretty interesting—corn kernels soaked in a lime-water solution, then dried and reconstituted. I initially didn’t know what to expect from the canned hominy, but I liked its chewy texture. I found dried white hominy at a Mexican grocery and it looked like the cracked corn in the birdseed mixture we put in the bird feeder. :)


Now this recipe is simple in its preparation, but it also takes some time. The hominy took only 2-1/2 hours to cook, but add in the toasting, soaking, and pureeing the chili peppers, then the actual preparation of the soup itself, and it was a bit time-consuming. Well worth it, mind you, but I am glad that I had my laptop in the kitchen so I could spend the downtime working.


Here is the dried, and cooked, hominy. Really, the cooked version is not as gloppy as it looks. Once the cooking water is drained, or in the case of this recipe added to the posole along with the hominy, the kernels are more... individual.


In my pantry is a package of dried New Mexico chili peppers, some of which I have used ground to in a recipe or two during this past winter, so I used them again for this soup. I find that it’s easy to toast dried peppers when, after they are split and the seeds are removed, they are toasted in a dry skillet with a small, heavy lid to weigh them down and press them flat to the heat.


The shape of the dried chilies indicated that I should soak them in a loaf pan.


I followed the recipe almost to the letter, except (and, yes, there is always an “except”!):


1) I used canary beans instead of those wonderfully whimsical-sounding Eye of the Goat beans.

2) Instead of purchased rotisserie chicken (which contains a lot of fat), I used boneless, skinless chicken breasts which I had poached, cooled in the broth, and shredded

3) I added ½ tablespoon of sugar at the end (the chilies seemed to be a little bitter)

4) I thickened the broth with 1½ tablespoons of arrowroot

We loved this! It was worth every bit of work. The broth is thick and rich and flavorful with the pureed chilies and all of the other ingredients blend together very well. I find that I really enjoy the texture of the hominy, which makes the soup vary hearty. Don’t forget the garnishes because they make the posole. We used shredded cheese, chopped tomato and avocado, and cilantro. This recipe made about 10 cups, so we are looking at a couple of more days of this wonderful stuff. No problem, there!


Also, if you cannot locate dried Anaheim or New Mexico Chilies, I think that Ancho chilies would work as well.


Following is the recipe as I copied it from Laura's post at The Spiced Life


Posole With Eye Of The Goat Beans & Shredded Chicken
Adapted from Heirloom Beans, Steve Sando


For the hominy:
1/2 medium onion, chopped
2/3 cup dried hominy
water


For the soup:
1 medium onion, chopped
4 dried Anaheim chile peppers (New Mexico is fine too)
boiling water to cover the chile peppers
2 T olive oil
5 garlic cloves, minced
1 1/2 t Mexican oregano
4 cups chicken stock, preferably homemade
1 15 oz can tomatoes, chopped or whole, drained (or if it is summer use 4 plum tomatoes)
2 cups drained, cooked Eye of the Goat beans (or any pinto type)
1 1/2 cups shredded rotisserie chicken
salt and pepper to taste


For the garnishes:
chopped cilantro
fried or soft corn tortillas, to taste (we like the crunch of the fried)
1 avocado, diced
1 lime, sliced into wedges
diced monterey jack or crumbled quesco fresco
sweet tomato relish or maybe some honey and chile pepper flakes
finely chopped onion


Cook the hominy by combining the chopped onion, dried hominy and water to cover by 2 inches in a small saucepan. Bring it to a simmer on medium low heat and cover, reducing the heat. Simmer for 3 hours, adding water if necessary to keep covered, or until the hominy is chewy tender. Season with salt toward the end of cooking. Set aside undrained.


Slit the dried chiles and remove the stems and seeds. Flatten them and toast them in a skillet over medium high heat, about 15 seconds per side. They will blister and lighten in color and become aromatic--but be sure they do not burn. place in a small bowl and cover with boiling water for 20-30 minutes.


Place the chiles into a blender with enough of their soaking water to puree to liquid the consistency of buttermilk.


Chop the onion for the soup. Heat a large soup pot or dutch oven over medium high heat. Add the olive oil and heat it to shimmering. Add the chopped onion with a pinch of salt and cook until translucent. Add the garlic and oregano and cook an additional minute, stirring. Add the chicken stock, chile puree, and tomatoes and bring to a boil. Add the cooked hominy with 1 cup of its cooking broth to the soup. Return to a boil. Add the beans and reduce the heat to maintain a simmer for 20 minutes. Add the chicken and simmer an additional 5 minutes. Season with salt and pepper to taste. Add a squirt of lime if you think it needs it.


Ladle the soup into deep bowls and add the garnishes.