Monday, April 6, 2009

Vegetarian Mulligatawny

I love fun-sounding words and phrases. In my previously-posted recipe, the title of the beans used was Eye of the Goat beans and that unusual name intrigued me enough to make it (of course, I didn’t have that particular bean so I subbed Canary beans, the name of which I find slightly less amusing although much better than kidney).


A few weeks ago I ran across a recipe for Mulligatawny. I have fun saying that name—mulligatawny! Yes, I am easily amused. :) I have never had nor made this soup, but I believe that it was mentioned in the Soup Nazi episode of Seinfeld many years ago. This vegetarian recipe, which was entered in March's edition of No Croutons Required by the author of Asparagus and Raspberries, contained a few vegetables which I happened to have on hand and wanted to use.


I looked up “mulligatawny” online and found a zillion widely varying recipes. Although it seems to be Indian in origin, it is actually British (from when they occupied India and altered a regional soup recipe to use ingredients with which they were familiar). Many of the recipes contained lentils or rice, which the original recipe does not contain and I ended up adding cooked basmati rice at the last minute.


This recipe has a huge ingredient list, and lots of time is spent in preparing the vegetables, but the resulting soup is well worth the effort.


With a 3-4 hour simmering time, as long as you (or a responsible person) is around to give the mixture a stir every now and then, you don’t have to spend all of those hours babysitting it. I went for an hour-long run, and set a kitchen timer to remind Jack to stir it every 20 minutes.


And it made the house smell wonderful, like stepping into the very best Indian restaurant you’ve ever visited. With four hours of simmering (apparently you can get away with three), the fragrance of curry was permeated into our living areas until the next morning (and, believe me, neither of us minded a bit!).


Above shows the curry powder roasting in the oil and butter. I, of course, decreased both of those ingredients from the original recipe. And pardon the old (to say the least) pot. I don’t have a nice Dutch oven at the lake house and I found this in the far reached of the cupboard. I make chili in it occasionally. A nice, very heavy pot which Jack brought into our marriage (noooo, it couldn’t have been a LeCreuset piece, could it?!), but no matter how I tried I could not remove the black from the inside.


I believe that an essential step is lightly sautéing the vegetables in the oil/butter/curry mixture. The vegetables had a chance to absorb this wonderful flavor before the liquid ingredients were added.


I made some changes in the recipe, but the most major change was in the structure of the ingredient list. I am a little fussy when it comes to organization and I have to have recipes organized as well, letting me know the order in which I will be using the ingredients. I find it easier to cook this way.


We spent a few days at the lake house and I packed all of the ingredients and took them with us. I thought that I had frozen corn and lemon juice there only to discover that I did not, so those ingredients were left out. And, because of Jack’s inexplicable aversion to eggplant, I left that out as well. To add more flavor and nutrition, I used vegetable stock instead of some of the water in the soup.


I was unpacking after arriving at the lake house when I realized that I had forgotten the white potatoes. I had an equal amount of sweet potatoes, so I used them instead. I had thought that they may get a little mushy with the lengthy simmer, but I was wrong. In fact, I will now use sweet potatoes whenever I make this, just because they were so good. One last point, I used too much rice (and that has been corrected in the recipe below). The next day, you could have cut the soup into wedges, it was so firm. ;)


* Exported from MasterCook *


Vegetarian Mulligatawny


Adapted from a recipe by Asparagus & Raspberries


Servings: 8


Amount Measure Ingredient -- Preparation Method

----------- ------------ --------------------------------

2 tablespoons olive oil

1 tablespoon butter

1 1/2 tablespoons curry powder

3 medium potatoes -- peeled and diced

4 small carrots -- peeled and diced

2 large parsnips -- peeled and diced

1 large onions -- peeled and diced

2 whole leeks -- outer layers removed, thinly sliced

2 medium apples -- peeled and diced (Granny Smith apples hold up nicely to the long

simmer)

6 ounces yellow corn

10 ounces eggplant -- diced

1 large red bell pepper -- roasted, skin removed, diced

1 tbsp brown sugar

1 tsp cumin

1 tsp thyme

1 tsp nutmeg

2 large bay leaves

15 ounces canned diced tomato

4 cups water

2 cups low-sodium vegetable stock

8 ounces light coconut milk

1/2 cup fresh parsley -- chopped

1/2 cup pistachio nuts -- chopped

1 medium lemon -- juice only (use some of the peel as garniture)

1 large lime -- juice (use some of some of the peel as garniture)

3/4 cup basmati rice -- cooked


Prepare all the vegetables.


Start by roasting the curry in the oil and butter in a Dutch over medium heat for about 2 minutes (stir constantly so it doesn't burn, you might have to turn down the heat a bit near the end).


Add the potatoes through bay leaves and cook the mixture, turning the heat to medium/low, stirring to coat all with the curry/oil. Make sure that the vegetables do not take color. Then add the canned tomatoes (undrained), water and vegetable stock and bring to a boil before you leave it to simmer, covered, for 3 - 4 hours. Set the lid of the pot ajar a little for some steam to escape (but not too much or the liquid may evaporate and boil away!).


Stir every now and then. This thickens the soup and intensifies the taste.


Add the coconut milk through the cooked rice, blend in with the rest of the soup, and simmer for another 10 minutes.


Serve with a bit of nut-parsley topping if desired, or chopped cilantro, or lime and lemon zest.


- - - - - - - - - - - - - - - - - - -

Per serving: 349 Calories (kcal); 12g Total Fat (3g Saturated); (28% calories from fat); 8g Protein; 58g Carbohydrate; 4mg Cholesterol; 233mg Sodium

Food Exchanges: 2 Grain(Starch); 1/2 Lean Meat; 2 Vegetable; 1/2 Fruit; 2 Fat; 0 Other Carbohydrates

Sunday, April 5, 2009

Posole with Eye of the Goat Beans and Shredded Chicken

Not too surprisingly, since I was raised and still live in southwestern Pennsylvania and did not even taste a taco until I was a junior in college, I had not tried posole until this past winter. I saw a recipe, and it looked very interesting, but I had a difficult time locating hominy until I finally found it at… WalMart. This was canned hominy, and I posted about the Posole Rojo a month or two ago.


Since both Jack and I really enjoyed it, when I saw this recipe for Posole with Eye of the Goat Beans and Shredded Chicken, and it used dried hominy, I decided to give it a try.


But, first, from those (like myself) who are uncertain about what posole really is, a Wiki-definition:

Pozole (from Spanish pozole, from Nahuatl potzolli; variant spellings: posole, pozolé, pozolli) is a traditional pre-Columbian soup or stew from Mexico and New Mexico. It is made from hominy, with pork (or other meat), chili pepper, and other seasonings and garnish, such as cabbage, lettuce, oregano, cilantro, radish, avocado, lime juice, etc. There are a number of variations on pozole, including blanco (white or clear), verde (green), rojo (red), de frijol (with beans), and elopozole (sweet corn, squash, and chicken or pork meat).


Hominy itself is pretty interesting—corn kernels soaked in a lime-water solution, then dried and reconstituted. I initially didn’t know what to expect from the canned hominy, but I liked its chewy texture. I found dried white hominy at a Mexican grocery and it looked like the cracked corn in the birdseed mixture we put in the bird feeder. :)


Now this recipe is simple in its preparation, but it also takes some time. The hominy took only 2-1/2 hours to cook, but add in the toasting, soaking, and pureeing the chili peppers, then the actual preparation of the soup itself, and it was a bit time-consuming. Well worth it, mind you, but I am glad that I had my laptop in the kitchen so I could spend the downtime working.


Here is the dried, and cooked, hominy. Really, the cooked version is not as gloppy as it looks. Once the cooking water is drained, or in the case of this recipe added to the posole along with the hominy, the kernels are more... individual.


In my pantry is a package of dried New Mexico chili peppers, some of which I have used ground to in a recipe or two during this past winter, so I used them again for this soup. I find that it’s easy to toast dried peppers when, after they are split and the seeds are removed, they are toasted in a dry skillet with a small, heavy lid to weigh them down and press them flat to the heat.


The shape of the dried chilies indicated that I should soak them in a loaf pan.


I followed the recipe almost to the letter, except (and, yes, there is always an “except”!):


1) I used canary beans instead of those wonderfully whimsical-sounding Eye of the Goat beans.

2) Instead of purchased rotisserie chicken (which contains a lot of fat), I used boneless, skinless chicken breasts which I had poached, cooled in the broth, and shredded

3) I added ½ tablespoon of sugar at the end (the chilies seemed to be a little bitter)

4) I thickened the broth with 1½ tablespoons of arrowroot

We loved this! It was worth every bit of work. The broth is thick and rich and flavorful with the pureed chilies and all of the other ingredients blend together very well. I find that I really enjoy the texture of the hominy, which makes the soup vary hearty. Don’t forget the garnishes because they make the posole. We used shredded cheese, chopped tomato and avocado, and cilantro. This recipe made about 10 cups, so we are looking at a couple of more days of this wonderful stuff. No problem, there!


Also, if you cannot locate dried Anaheim or New Mexico Chilies, I think that Ancho chilies would work as well.


Following is the recipe as I copied it from Laura's post at The Spiced Life


Posole With Eye Of The Goat Beans & Shredded Chicken
Adapted from Heirloom Beans, Steve Sando


For the hominy:
1/2 medium onion, chopped
2/3 cup dried hominy
water


For the soup:
1 medium onion, chopped
4 dried Anaheim chile peppers (New Mexico is fine too)
boiling water to cover the chile peppers
2 T olive oil
5 garlic cloves, minced
1 1/2 t Mexican oregano
4 cups chicken stock, preferably homemade
1 15 oz can tomatoes, chopped or whole, drained (or if it is summer use 4 plum tomatoes)
2 cups drained, cooked Eye of the Goat beans (or any pinto type)
1 1/2 cups shredded rotisserie chicken
salt and pepper to taste


For the garnishes:
chopped cilantro
fried or soft corn tortillas, to taste (we like the crunch of the fried)
1 avocado, diced
1 lime, sliced into wedges
diced monterey jack or crumbled quesco fresco
sweet tomato relish or maybe some honey and chile pepper flakes
finely chopped onion


Cook the hominy by combining the chopped onion, dried hominy and water to cover by 2 inches in a small saucepan. Bring it to a simmer on medium low heat and cover, reducing the heat. Simmer for 3 hours, adding water if necessary to keep covered, or until the hominy is chewy tender. Season with salt toward the end of cooking. Set aside undrained.


Slit the dried chiles and remove the stems and seeds. Flatten them and toast them in a skillet over medium high heat, about 15 seconds per side. They will blister and lighten in color and become aromatic--but be sure they do not burn. place in a small bowl and cover with boiling water for 20-30 minutes.


Place the chiles into a blender with enough of their soaking water to puree to liquid the consistency of buttermilk.


Chop the onion for the soup. Heat a large soup pot or dutch oven over medium high heat. Add the olive oil and heat it to shimmering. Add the chopped onion with a pinch of salt and cook until translucent. Add the garlic and oregano and cook an additional minute, stirring. Add the chicken stock, chile puree, and tomatoes and bring to a boil. Add the cooked hominy with 1 cup of its cooking broth to the soup. Return to a boil. Add the beans and reduce the heat to maintain a simmer for 20 minutes. Add the chicken and simmer an additional 5 minutes. Season with salt and pepper to taste. Add a squirt of lime if you think it needs it.


Ladle the soup into deep bowls and add the garnishes.


Wednesday, April 1, 2009

Peanutty Spinach Curry

What? No soup post? How can that be??? Because it’s April first and I tend to make less soup and stew meals as the weather warms up. And I am celebrating by keeping those white rimmed soup bowls in the cupboard for a while.


Yes, I know that we regularly have early-April snowfalls, but they are usually light and do not last long. Soon the toads in the pond will be singing, and the crickets chirping. I cannot wait!


That being said, today was mostly a cool and rainy one. March came in like a lion, then went out like a lamb (it was 74 degrees yesterday); but April is being… April.


I wanted to make something spicy and warming for dinner, and pulled a recipe which I had printed from A Spiced Life a few weeks ago. I happened to have a lot of spinach to use up, and this spinach and peanut curry sounded good (and we know how much Jack loves anything with peanuts!). When I started to pull it together, though, I began to doubt my choice. It just didn’t seem like something Jack would like, being mostly spinach and peanuts with spices, but time was running out. As the curry cooked, I turned on the oven and heated a tray of Trader Joe’s vegetable samosas, and also a couple pieces of TJ’s naan. I figured that Jack could fill up on carbs if he didn’t like the spinach.


It was with great trepidation that I told him when dinner was ready. I spooned the spinach curry over rice, arranged 4 (mashed potato & peas-filled) samosas beside, and also plunked down a plate of naan. He looked up and asked if it were Carb Night. :) No, I replied, just some extra food in case you don’t like the spinach.

Well, I was stunned at his reaction—he loved it! In fact, he kept commenting on how “wonderful” it tasted. And, yes, I thought it did too. Who would have thought—spinach, peanuts, spices… it really was delicious! Very flavorful, and I must say that spinach has never tasted so good!


Here is the recipe as Laura posted it, her adaption of a recipe found in the wonderful book "660 Curries". It seems as though it serves 4. I halved the ingredients for us, and used less peanuts. Also, instead of boiling the spinach (a huge loss of nutrients, I think), I used a steamer basket. When I removed the spinach from the steamer, I placed it in a colander over a bowl, and used the water which drained off instead of the water from boiling the spinach, which was called for later in the recipe.


I also used plain yogurt (nonfat, European-style).


Now this is not a curry as I think of when I say “curry”, but this recipe will absolutely go into my binder to try, try again. Yum (and a quite surprised yum, at that!)


Monday, March 30, 2009

Sweet Potato Sopa De Lima

I cannot seem to get enough of soups and stews lately, and looking through my blog posts, this is quite obvious. But soon the grey clouds will go away, the temperatures will warm, and I will be making almost every meal on the grill. That’s just how it goes, here. :)


I found a recipe for Sweet Potato Sopa De Lima on The Spiced Life. I had only one sweet potato in the pantry and wanted to be rid of it, so I decided to give this a try. With a few alterations, of course (noted below in green type).


Laura used a combination of chicken and pork stock and, since I omitted the chicken to make this a vegetarian meal, I used vegetable broth. I subbed tomatillo salsa verde for the tomatillos, and where Laura used lemon juice, I used lime. And I thickened the final soup with a cornstarch and water mixture (Jack being the kind of guy who prefers his soups to be thick and “not dribbling down my chin”…)


The recipe didn’t indicate how many servings it made, and I would estimate that to be at least 8. But we ate it for 3 days, each time for lunch and with different garnishes, and each bowlful was enjoyed.


Now, I have to say that this tastes better the day after it is made, when the flavors have the opportunity to meld in the refrigerator a bit. The first day, I served the soup with steamed corn tortillas; the second day I served it over cooked brown rice; the third day I stirred the cooked brown rice directly into the soup. We preferred the rice additions. As for garnishes we used chopped fresh tomato and cilantro one day; chopped avocado, cilantro, and cheese the next; and a squiggle of thinned sour cream and some shredded lowfat cheddar on the third day. A nice way to add variety to the same soup when you enjoy it three days in a row!


This soup had a wonderful spicy-and-sour taste, and I do look forward to making it again before these cool, rainy days of spring are over.


Sweet Potato & Tomatillo Sopa De Lima

1 large red onion, chopped
1-2 T olive oil
6-8 garlic cloves, minced
1 large sweet bell pepper, chopped (I used orange bell)
1 jalapeno, seeded and minced
2 t ground cumin
1 t ground coriander
1 t ground New Mexico Chile powder
1 large sweet potato (the orange kind), diced (I peeled it as well)

64 ounces low-sodium chicken or vegetable broth
8 oz chopped tomatoes (or about half a can of diced tomatoes, drained a bit)
1 cup roasted and pureed fresh tomatillos (I used 1 cup of salsa verde)
2 -15 ounce cans of beans (I used one can of black beans and one can of green pigeon peas, drained and rinsed)
1 bag frozen corn, preferably organic, or equivalent fresh
1 1/2 cups shredded roasted chicken (I eliminated this)
1/3 - 3/4 cup fresh lemon juice (I used lime juice; start with the smaller amount and add to taste)

cooked brown rice, optional (I would estimate cooking 2/3 cup of brown rice)

For garnish (any or all):
sour cream
monterey jack cheese
salsa verde

chopped tomatoes

chopped cilantro

chopped avocado

Heat a large soup pot or dutch oven on medium high heat and add the olive oil to heat it to shimmering. Add the onions with a pinch of salt and cook, stirring occasionally, for about 10 minutes.


Add the garlic, jalapeno and bell pepper and cook another 3 minutes. Add the spices and the sweet potatoes and cook, stirring, for about 1 minute. Add the tomatoes and cook for 3 more minutes. Add the tomatillos (or salsa verde) and cook another minute or 2. Add the broth and bring to a boil. Reduce heat to a simmer and cover and cook until sweet potatoes are tender (10-30 minutes, about, depending on how cooked the sweet potatoes got from the frying and how big the dices are).


Add the lime juice and taste for saltiness, sourness, and seasoning in general. Add the beans, corn, and shredded chicken and return to a simmer. Serve with garnishes.


Sunday, March 29, 2009

Garlicky Black-Pepper Shrimp and Black-Eyed Peas

Ahhh, spring in southwestern PA… 55 degree high on one day, the next day is 70, the following day dips to 45… No wonder I can’t seem to determine if my “sniffles” are allergy- or cold-related!


I found a recipe in Gourmet magazine a few weeks ago and prepared it during one of the cooler days during this past week. Garlicky Black-Pepper Shrimp and Black-Eyed Peas is one of those warming dishes that we welcome at this time of year. Spicy (because of the amount of black pepper) shrimp simmered in a fragrant broth with black-eyed peas is very comforting on a raw March day. My only change to the recipe was to use turkey bacon, and reduce the amount of oil a little (because I used a nonstick skillet).


I served this over brown rice, with a green salad, and it was very, very good.


* Exported from MasterCook *


Garlicky Black-Pepper Shrimp and Black-Eyed Peas


Recipe By: Paul Grimes

Servings: 6


Amount Measure Ingredient -- Preparation Method

-------- ------------ --------------------------------


3 tablespoons olive oil -- divided

4 slices turkey bacon

4 scallions -- chopped

1 medium carrot -- finely chopped

1 celery rib -- finely chopped

1/2 medium green bell pepper -- chopped

2 large garlic cloves -- finely chopped

2 Turkish bay leaves -- ( or 1 California)

1 teaspoon dried thyme

1/8 teaspoon hot pepper flakes

18 ounces black-eyed peas -- (2 15-ounce cans, drained and rinsed)

1 3/4 cups low-sodium chicken broth

1 pound large shrimp -- peeled and deveined

1/2 teaspoon freshly ground black pepper

1/4 teaspoon salt

3 large garlic cloves -- minced

1/2 cup dry white wine


Cook bacon in a 12-inch nonstick skillet over medium heat until browned but not crisp. Transfer bacon to a paper towel, press against towel to absorb excess fat, cool, then tear into small pieces.


Wipe out the skillet with a paper towel, then drizzle with 1 tablespoon of olive oil. Cook scallions, carrot, celery, bell pepper, garlic, bay leaves, thyme, red-pepper flakes, 1/8 teaspoon salt, and 1/4 teaspoon pepper over medium-low heat, stirring often, until vegetables are pale golden, about 8 minutes. Add black-eyed peas and broth and simmer for 5 minutes. Transfer to a bowl.


Heat remaining oil (2 tablespoons) in skillet over medium-high heat until it shimmers. Season shrimp with black pepper and salt. Cook shrimp with garlic, stirring occasionally, until just opaque (shrimp will not be fully cooked), about 3 minutes. Add wine and bring to a boil, then briskly simmer 2 minutes. Add bacon and black-eyed-pea mixture and simmer until just heated through (mixture will be juicy). Discard bay leaves.


Serve over hot cooked rice, if desired.


Source:

"Gourmet, March 2009"

- - - - - - - - - - - - - - - - - - -


Per serving: 487 Calories (kcal); 12g Total Fat (2g Saturated); (21% calories from fat); 41g Protein; 56g Carbohydrate; 123mg Cholesterol; 362mg Sodium


Food Exchanges: 3 1/2 Grain(Starch); 4 Lean Meat; 1/2 Vegetable; 0 Fruit; 1 1/2 Fat; 0 Other Carbohydrates


Thursday, March 26, 2009

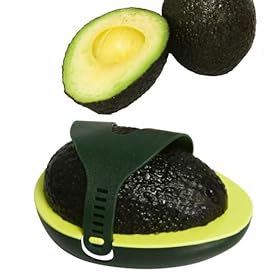
Avo Saver

I try not to collect a lot of kitchen gadgets, but for some reason my drawers and cupboards are full of them. A few years ago, I did a massive cleaning and reorganization to rid my kitchen of many of these. Since then, I've tried to use a rule while shopping: buy no gadget nor tool which has only one particular use. Mostly, this has worked to keep me from purchasing something that I will rarely use and it has kept my kitchen a little more tidy.

When I saw the Avo Saver at TJ Maxx, I passed it by. But then I started thinking. Several times I need only a half of an avocado and, no matter what I do, I can not get the other half to last for more than a few hours without "turning". I keep the pit in, brush the cut side with lime juice or lemon juice or Fruit Fresh, wrap tightly in plastic... to no avail. So I went back and bought the Avo Saver, figuring that I will use it one time and if it doesn't work, I will return it.


Two days ago I cut an avocado in half, twisted it, and separated the halves. I set aside the half without the pit to use in a salad, then brushed some lemon juice on the other cut half. I placed it in the Avo Saver, tightened the little belt-thing, and put it in the refrigerator. Today I removed the avocado and was quite surprised to find that the cut side was still green-yellow and there was very little oxidation. It works!

Yes, it's definitely an only-one-use kitchen gadget, but I need this! Really, I do! :D

Just thought I'd let you all in on this discovery...

ADDITION!!!

I have used the Avo-Saver several times I still like it!


Here is a photo of an avocado half 53 hours after it was cut in half, brushed with fresh lime juice, and "belted" into the AvoSaver.


I have found that the secret to doing this successfully is to make a nice, clean, even cut so the surface of the avocado fits tightly against the plastic surface of the AvoSaver. Also, do this just after brushing with lemon/ lime juice, while the avocado surface is still wet with the juice. This makes a sort of vacuum "seal". When you finally do release the avocado, you will probably need to twist it a bit to break the seal and release the avocado half.


Tuesday, March 24, 2009

Glazed Double-Chocolate Marble Cake

I am having a difficult time losing my layer of Winter Fat this year, and since I have increased my running I can only blame--- food. Sweets, in particular. No sooner had I finished the Christmas cookies, then Valentine’s Day baking came around, and then, most recently, my Dad’s birthday. I adore chocolate, and haven’t yet met a cake or cookie I didn’t like (my only saving grace, if it should be called this, is that I am not wild about pie). I am also crazy about carbs. I am writing this while eating a nice, warm slice of Mom’s cinnamon bread. Hey, it’s still 2 hours until dinner!


Anyway, Easter looms on the horizon. This year I will not be spending it with my family, so I suppose the only good aspect of this is that the piles of my Mom’s homemade goodies will not be tempting me every second of my waking moments while we are there. But first, as I mentioned, my Dad’s birthday. This was a biggie, #75, and I made his cake.


This was one of three cakes offered that day. My twin nieces were born on the same day as my Dad, so they also have been joining in on his celebration for the past 10 years. Mom made each girl their own cake, too, so there was a lot to choose from. Or maybe not so much, since 20 people blew through most of all 3 cakes and there was little leftover (yay!).


The cake which I made was from Canadian Living’s Holiday Best 2005 issue, Glazed Double-Chocolate Marble Cake. Actually, it is triple chocolate since there is white chocolate and unsweetened chocolate in the batter, and bittersweet chocolate in the glaze. Heaven.


I’ve never had a lot of luck with making cakes from scratch, but have found that bundt-type cakes are much more forgiving than the layer cakes. This one was quite easy to make and tasted absolutely delicious. And that ganache used to glaze it with… wow. It was a perfect “frosting” as it added a nice silky-sweet chocolate taste, yet did not dominate the cake like traditional frostings can do. Basically, this was melted bittersweet chocolate and whipping cream, and some day I will make up a nice, warm bowlful and eat it with a spoon…


Now, I altered the directions from the original recipe a little. I have found that cakes become lighter in texture when the ingredients are not cold, so take out the butter, eggs, and buttermilk beforehand. In fact, the butter should be well-softened, so that ingredient should be taken out earlier if possible. The chocolates which are used in the batter must be melted and cooled before making the cake, so this needs to be done prior to turning on the oven. Yes, it’s a little fussy but marble cakes are. And this one is worth it. I am including the nutritional information at the end of the recipe, but I haven’t yet worked up the courage to look at it.


* Exported from MasterCook *


Glazed Double-Chocolate Marble Cake


Recipe By: Canadian Living Fall 2005

Servings : 16


Amount Measure Ingredient -- Preparation Method

-------- ------------ --------------------------------


2/3 cup butter -- softened

2 ounces unsweetened chocolate -- chopped

3 ounces white chocolate -- chopped

3 large eggs

1 cup lowfat buttermilk

2 1/4 cups all-purpose flour

1 teaspoon baking powder

1 teaspoon baking soda

1/2 teaspoon salt

1 1/2 cups granulated sugar

2 teaspoons vanilla

2 ounces bittersweet chocolate -- chopped

1/4 cup heavy cream


Remove the butter from the refrigerator to soften.


In a glass bowl, melt the unsweetened chocolate in the microwave (or over a pan of hot water) and set aside to come to room temperature. Repeat with the white chocolate.


Take the eggs out of the refrigerator and measure 1 cup of buttermilk; place both on the counter to start to come to room temperature a bit.


Grease a 10-cup Bundt pan and dust with flour (note: I have great results with Baker's Joy in lieu of the grease-and-flour) and set aside.


In a medium bowl, whisk together the flour, baking powder, baking soda, and salt. Divide this dry mixture in half (using a scale or measuring cups), placing in separate bowls. Set both bowls aside.


Preheat oven to 325F


In a large bowl, use an electric mixer to beat the softened butter until creamy. Gradually add the sugar, while still beating, and beat for about 3 minutes or until the mixture is fluffy. With the mixer running, add the eggs (one at a time), and beat well after each addition. Beat in vanilla.


Spoon half of the batter into a medium bowl and stir in the unsweetened chocolate. To the rest of the batter, add the white chocolate and stir well.


Working with the dark chocolate batter, add half of the first bowl of dry ingredients, stir a little, then add HALF of the buttermilk, stir, then add the remaining half of that first bowl of dry ingredients.


Repeat this with the white chocolate batter and the second bowl of dry ingredients (flour, etc.).


Using a large serving spoon, dollop the batter into the bundt pan, alternating dark and light batters. Make 2 or 3 layers of "dollops" in the pan then, when the batters are used, run a spatula through all layers to swirl. Tap the pan twice on a hard surface to break and interior bubbles, and place in the center of the oven.


Bake for about 45 minutes, then test with a toothpick or cake tester. Depending on if you use a dark or shiny pan, it may take up to 55 minutes for the cake to bake completely (the toothpick will come out of the cake with no crumbs attached). Cool on a wire rack for ten minutes, use a small rubber spatula to loosen the cake from the sides and center tube, shake just a bit to further loosen, place a greased wire rack over the top, and invert the cake. Cool completely. (At this point you can hold the cake, wrapped in plastic, for 24 hours; wrapped further in foil it can be frozen for up to a month)


TO GLAZE:


Place chopped bittersweet chocolate in a heatproof bowl. In a saucepan, bring the cream just to boiling over medium heat. Pour over the chocolate and stir until chocolate melts. Let stand for 10 minutes, then brush over the cake (if desired, place strips of waxed paper under the outer edge of the cake to catch the drips). Sprinkle chocolate curls over the cake. Let stand at a cool temperature until ganache is set, about 40 minutes. (Cover cake with bowl or other cover which will not "touch" the surface of the ganache, and store at a cool-ish room temperature for up to 24 hours)

- - - - - - - - - - - - - - - - - - -

Per serving: 301 Calories (kcal); 16g Total Fat; (45% calories from fat); 4g Protein; 38g Carbohydrate; 61mg Cholesterol; 284mg Sodium

Food Exchanges: 1 Grain(Starch); 0 Lean Meat; 0 Vegetable; 0 Fruit; 3 Fat; 1 1/2 Other Carbohydrates


I had no time to take a photo once the cake was cut, and it was very pretty with the dark-and-light swirls.


Ahhh, chocolate curls. The bane of my cake-making existence. I love how they look, but I am rarely satisfied with how they turn out no matter how many tips I read or instructional videos I watch. And a note for those who are interested in the marbleized curls—the white chocolate does not easily bind with the dark chocolate and, only at a very certain temperature, will they choose to curl together without breaking apart. It drove me nuts and took hours, and I still wasn’t satisfied. But everyone ooohed and aaahed, so I figured that it didn’t look too bad! :) Unfortunately, there was a lot of waste. Which is all now on my waist.