Sunday, November 21, 2010

King Prawn Korma

Still cleaning out the freezers… :)


I am quite embarrassed to reveal that one recent dinner came as a result of my finding a bag of jumbo butterflied shrimp, in the bottom of the bottom-most basket in the biggest freezer, which had been there since July 2009. *blush* I’ve come across it on occasion, and was “saving” the shrimp for grilling, but I cleaned and covered our grill last week. I also thought that it probably should be cooked in a sauce since it may not have the best flavor or texture after being frozen for so long.


In one of my favorite cookbooks, Curry, Fire & Spice by Mridula Baljekar, I found a recipe for King Prawn Korma which fit the bill nicely. It was also a snap to make. The shrimp were surprisingly good, just a little tough, but the flavor of the sauce more than made up for it. I served the shrimp over rice with some vegetables also sautéed in Indian spices. I soooo adore Indian food! :)


* Exported from MasterCook *

King Prawn Korma


Recipe By: Mridula Baljekar

Servings: 4


Amount Measure Ingredient -- Preparation Method

-------- ------------ --------------------------------


1 pound jumbo shrimp -- (about 10-12) Peeled and deveined; well-drained if

previously frozen

2 tablespoons plain yogurt

1 teaspoon paprika

1 teaspoon garam masala

1 tablespoon tomato paste

1/4 cup coconut milk

1 teaspoon chili powder

2/3 cup water

1 tablespoon canola oil

1 teaspoon crushed garlic

1 teaspoon grated ginger root

1 piece cinnamon stick -- 1"; halved

2 whole green cardamom pods

1 tablespoon chopped fresh cilantro


Mix yogurt through chili powder in a bowl. Slowly add water and whisk until combined. Season with salt, if desired. Set aside.


Heat the oil in a wok and add the garlic through cardamom and fry over low heat for 1-2 minutes (do not allow spices to burn). Pour in the yogurt mixture and bring to a boil, stirring occasionally. Add the prawns and cook, stirring constantly, until sauce starts to thicken and prawns are opaque.


Served over hot steamed rice, sprinkle with cilantro.


Source:

"Curry Fire & Spice: Over 150 Great Curries from India and Asia"

- - - - - - - - - - - - - - - - - - -

Per serving: 197 Calories (kcal); 9g Total Fat (4g Saturated); (43% calories from fat); 24g Protein; 4g Carbohydrate; 173mg Cholesterol; 214mg Sodium

Food Exchanges: 0 Grain(Starch); 3 Lean Meat; 0 Vegetable; 0 Fruit; 1 1/2 Fat; 0 Other Carbohydrates

NOTES : I used lowfat yogurt and light coconut milk.

*I also stirred in 1/2 teaspoon of coconut extract just before serving to "punch up" the coconut flavor.*


*Note to Vicci the Forgetful-- place the coconut extract bottle on one of the dinner plates so you don't forget this step. :)


Also added red pepper flakes at the table.

Sunday, November 14, 2010

Indian Spiced Kale & Chickpeas

My garden is a barren patch of land… except for the kale which is still going strong. Jack is not wild about it, and I am able to circumvent that when I add it to a soup or stew. But he does not appreciate kale when it is the “star attraction” of a recipe; which I why I saved this Eating Well recipe to make just for myself.


I had the opportunity the other day and made the Indian Spiced Kale & Chickpeas for lunch while he was at a meeting. I have to admit, though, that the kale was a bit too much as a main dish. Or it could have been served over rice. But, in any case, it was very good.


I followed the recipe and changed it buy adding additional cumin and garam masala, and also some hot curry powder. I just love Indian spices, and I could have upped the quantities even a bit more. I also added sautéed onion and tomatoes for both extra color and flavor.


Served with (Trader Joe’s) naan, it made a nice, filling lunch. I will make it again, but perhaps as a side dish.


Indian Spiced Kale & Chickpeas


4 servings, about 3/4 cup each

Active Time:

Total Time:

  • 1 tablespoon extra-virgin olive oil
  • 3 cloves garlic, minced
  • 1-1 1/2 pounds kale, ribs removed, coarsely chopped (see Tip)
  • 1 cup reduced-sodium chicken broth, or vegetable broth
  • 1 teaspoon ground coriander
  • 1/2 teaspoon ground cumin
  • 1/4 teaspoon garam masala, (see Ingredient note)
  • 1/4 teaspoon salt
  • 1 15-ounce can chickpeas, rinsed

Preparation

  1. Heat oil in a Dutch oven over medium heat. Add garlic and cook, stirring, until fragrant, about 30 seconds. Add kale and cook, tossing with two large spoons, until bright green, about 1 minute. Add broth, coriander, cumin, garam masala and salt. Cover and cook, stirring occasionally, until the kale is tender, 8 to 10 minutes. Stir in chickpeas; cover and cook until the chickpeas are heated through, 1 to 2 minutes.

Tips & Notes

  • Tip: A 1- to 1 1/2-pound bunch of kale yields 16 to 24 cups of chopped leaves. When preparing kale for these recipes, remove the tough ribs, chop or tear the kale as directed, then wash it--allowing some water to cling to the leaves. The moisture helps steam the kale during the first stages of cooking.

  • Ingredient Note: Garam masala, a ground spice mixture traditionally including coriander, cumin, cinnamon, peppercorns, cardamom and cloves, is commonly used in Indian cooking. Find it in the specialty-spice section of large supermarkets.

Eating Well October/November 2005


My changes: I sauteed chopped onion in olive oil before adding the garlic; I added a chopped tomato about 2 minutes before adding the chickpeas; cumin and garam masala amounts were doubled and a little hot curry powder was added for heat.

Thursday, November 11, 2010

Penne wiith Scallops and Shrimp

I am trying to clean out my freezers before the upcoming holiday season, and I'm amazed at what I am finding in there!


Last February we had a snowstorm and were without electricity for 10 days. We managed to save most of our refrigerated foods by transferring them to coolers, and the frozen foods by packing everything in snow in clean trash cans then burying the cans in snowdrifts. I would like to now pause in order to send Mother Nature heartfelt pleas not to put us through this torture during the coming (several) winter (s).


Anyway, when the power was finally restored and we were refilling the freezer I actually took notes as to everything that I put back in. Then I typed this list, and truly meant to keep it current. This lasted for about a month. Or two.


When I come home from shopping and am putting away groceries, it’s difficult to stop and catalog everything that goes into the freezer and refrigerator. And when I am cooking, I usually have to keep my mind on the recipe rather than updating the freezer list. That’s how it is. I make no excuses.


Anyway, back to trying to clear out the freezers.


We had spent several lovely autumn days last week working on outside projects. Although fall is an easier season than spring is around here, there still is painting to do, patio furniture and decorations to put away, the garden and flower beds to clear out and close up, etc. Dinner is rushed these days and since it gets dark earlier, I sometimes find myself putting away my tools by the light on the patio.


One evening, at 6pm no less, I dug through the freezer and found two small bags of shrimp, each a quarter full, and two bags of scallops (one bay, one sea), both less that a quarter filled. Hmmm. All I could think of was making it with pasta for a quick meal, and I put this recipe together. It was so good that Jack insisted I not only write down the ingredients in order to make it again, but that I not feel the need to make this when I only have bits of bagged seafood to use up.


I thawed the shrimp and scallops (there were more than there should have been for the two of us, and I didn’t even weigh them because we were starving) and once pasta is cooked, the tomatoes are chopped, the onion sliced and garlic minced, this meal goes together very quickly.


The whipping cream was added at the last-minute to give a little more “body” to the sauce and it worked great. I have discovered that I enjoy adding skim milk and just a teaspoon of heavy cream to my coffee in the morning rather than using sugary non-dairy creamers, so this normally lowfat kitchen has this particular ingredient (uncharacteristically) hanging about.


* Exported from MasterCook *


Penne with Scallops and Shrimp


Recipe By: Hunger & Desperation :)

Servings: 2


Amount Measure Ingredient -- Preparation Method

-------- ------------ --------------------------------


4 ounces whole wheat pasta -- penne or rotini

1 tablespoon olive oil

1/4 cup onion -- thinly sliced

1 1/2 teaspoons minced garlic

6 ounces shrimp -- peeled and deveined

6 ounces scallops

1 cup diced fresh tomato

1 cup green peas, frozen -- thawed

1 tablespoon minced fresh basil

1 teaspoon minced fresh oregano

1/2 teaspoon hot pepper flakes

2 teaspoons cornstarch

1 tablespoon water

1 tablespoon whipping cream -- optional

2 tablespoons grated Parmesan cheese

2 tablespoons fresh parsley -- chopped


Cook pasta according to package directions. Drain, RESERVING 1/3 CUP COOKING WATER, and set aside.


Heat oil in a medium-sized nonstick skillet over medium-high heat. Add the onions and garlic, stirring constantly for 30 seconds, then add the shrimp. Stir for one minute; add the scallops and cook, stirring, for 2 minutes. Add the reserved pasta cooking water, and ingredients through hot pepper flakes. Bring to a boil. While the mixture is heating, mix the cornstarch and water. Once the mixture has come to a boil, turn the heat to medium-low and stir in the cornstarch liquid. Stirring constantly, add the whipping cream and stir until thickened a bit. Add the pasta and stir until heated through. Divide between plates and sprinkle with Parmesan and parsley.


- - - - - - - - - - - - - - - - - - -

Per serving: 512 Calories (kcal); 14g Total Fat (4g Saturated); (24% calories from fat); 43g Protein; 55g Carbohydrate; 171mg Cholesterol; 375mg Sodium


Thursday, November 4, 2010

Green Tomato Curry with Potatoes and Garlic

Sometimes you come across a recipe that is an immediate favorite, so delicious that it takes your breath away (well, almost), and you can’t wait to make it again. I was fortunate to experience this the other day.


I had a large tub of green tomatoes that I picked from the garden in the days preceding our first frost on Monday morning. Never having actually eaten one I had no idea what to do with a green tomato, but there were so many in the garden that I just had to pick them. I had originally decided on making a green tomato relish. We don’t eat relishes, but I figured that I could give them away as gifts (the recipe was very well reviewed). Then, at the last minute, I did an internet search and found a curry recipe that really knocked our socks off.


Green Tomato Curry with Potatoes and Garlic, found on the Simple Bites site, is from the book 660 Curries by Raghaven Iyer . It is extraordinarily easy and very quick and, most importantly, incredibly delicious. I made the recipe as shown below, but instead of 2 servings I increased it by 50% to make 3 (because Jack has a problem with what is called a “serving size” in many recipes, so he usually gets 2 servings). I should have made a double recipe. Or more. We were both very disappointed when we finished our dinner! :)


If you enjoy Indian cuisine, give this a try. I only wish that I could have posted this a month ago when most of the people with veggie gardens had green tomatoes, and I promise to pull up this post next year in late September.


By the way, it looks as though we will be enjoying this for several more meals as today I cleaned, chopped, and froze 10 pounds of green tomatoes!


I served our curry with steamed basmati rice, and can only apologize for the photo by explaining that the meal was much, much better than it looks (can’t do a lot with brown food, you know!).


Green Tomato Curry with Potatoes and Garlic


This recipe for Green Tomato Curry with Potatoes and Garlic from Raghavan Iyer's 660 Curries is incredibly simple and perfect for any unwanted green tomatoes. The browning of the garlic at the beginning may sound a little extreme, but as long as it doesn't burn, you'll be left with this gorgeous aroma that will deepen the flavor of each bite. It's all balanced by the green tomatoes, which help lend the dish some much needed acidity.


About the author: Nick Kindelsperger is a freelance writer in Chicago and the co-founder of The Paupered Chef.


Ingredients

serves 2

  • 2 tablespoons canola oil
  • 4 garlic cloves, chopped
  • 8 ounces russet potatoes, peeled, and chopped into 1/2-inch cubes
  • 8 ounces green tomatoes, cores removed, sliced into 1-inch segments
  • 2 teaspoons garam masala
  • 1 1/2 teaspoons kosher salt
  • 1/4 teaspoon ground turmeric
  • 2 tablespoons cilantro, finely chopped

Procedures

  1. Pour the oil into a large skillet set over medium-high heat. Add the garlic and cook until it is reddish brown, about a minute or so. Stir often. Make sure it doesn't burn. If it does, then start over.
  2. Add the potatoes, tomatoes, garam masala, salt and turmeric. Turn heat down to medium. Stir occasionally, and cook for about 10 minutes.
  3. Pour in a cup of water. Scrap the pan with a wooden spoon, dislodging any browned bits. When the mixture comes to a boil, cover the skillet, reduce heat to medium low and simmer for 12 to 15 minutes or until the potatoes and tomatoes are tender. Stir every few minutes or so.
  4. You want the final sauce to be kind of thick, so mash up a few of the potatoes and tomatoes with the wooden spoon. Turn off the heat, stir in the cilantro, and serve.


*Vicci’s Notes: 2 servings? HA! I increased the recipe by 50% and should have doubled it. :)

Tuesday, November 2, 2010

Southwestern Pumpkin Burgers

I was scanning though some websites the other evening and came across a recipe on Eating Well which intrigued me. Southwestern Pumpkin Burgers. Imagine. I clicked off the site, but then a few minutes went back. I was planning to make pumpkin muffins the following morning and would have some canned pumpkin left over. I copied the recipe.


These were surprisingly good. Odd, yet good. In fact, Jack emphatically said that these were very good. Twice.


They were more on the line of falafel than a “burger”. Firm, crispy on the outside and soft inside, with a delicious flavor that was nicely accented with a large dollop of Trader Joe’s chipotle salsa. Eating Well, I apologize for snickering when I first saw the recipe…


The only change I would make would be to form the patties in an oval rather than a circle. Once it was placed in the flour tortilla there was a lot of tortilla left over on either side of the burger. Picky, picky, picky… ;) I served these with sweet potato fries and it was an excellent lunch.


Southwestern Pumpkin Burgers

From EatingWell: Summer 2002

Colorful, spicy and fragrant, these delicious burgers are right in style with the contemporary fondness for Southwestern foods, especially when served with Fresh Tomato Salsa.

6 servings | Active Time: 1 hour | Total Time: 1 hour

Ingredients

  • 6 teaspoons extra-virgin olive oil, divided
  • 1 medium onion, chopped
  • 1/2 cup finely chopped red or green bell pepper
  • 1/2 cup fresh or frozen corn
  • 2 cloves garlic, minced
  • 2 teaspoons chili powder
  • 1 teaspoon ground cumin
  • Tomato Salsa, optional
  • 1/2 cup canned unseasoned pumpkin puree
  • 1/2 cup shredded Monterey Jack, or Cheddar cheese
  • 1/2 cup toasted wheat germ
  • 1/2 cup fine dry breadcrumbs
  • 2 tablespoons chopped fresh parsley
  • 1/2 teaspoon salt
  • Freshly ground pepper, to taste
  • 6 8-inch flour tortillas, (soft-taco size)
  • 2 cups shredded lettuce

Preparation


  1. Heat 2 teaspoons oil in a large nonstick skillet over medium heat. Add onion and cook, stirring often, until softened, 5 to 7 minutes. Stir in bell pepper, corn, garlic, chili powder and cumin; cook, stirring, until fragrant, about 2 minutes more. Transfer to a large bowl; let cool to room temperature, about 10 minutes.
  2. Meanwhile, prepare Tomato Salsa, if using.
  3. Add pumpkin, cheese, wheat germ, breadcrumbs, parsley, salt and pepper to the onion mixture; mix well. With dampened hands, form the vegetable mixture into six 1/2-inch-thick patties, using about 1/2 cup for each.
  4. Preheat oven to 325°F. Stack tortillas and wrap in aluminum foil. Place in the oven for about 15 minutes to heat through. (Alternatively, stack tortillas between two damp paper towels; microwave on high for 30 to 60 seconds, or until heated through.)
  5. Using 2 teaspoons oil per batch, cook 2 to 4 patties at a time in a large nonstick skillet over medium heat until browned and heated through, about 4 minutes per side. Adjust heat as necessary for even browning. Wrap the patties in tortillas and serve immediately, garnished with lettuce and Fresh Tomato Salsa, if desired.

Nutrition

Per serving : 331 Calories; 13 g Fat; 4 g Sat; 7 g Mono; 8 mg Cholesterol; 45 g Carbohydrates; 12 g Protein; 6 g Fiber; 638 mg Sodium; 407 mg Potassium

3 Carbohydrate Serving


Tips & Notes


  • Make Ahead Tip: Prepare through Step 3. Wrap patties individually and refrigerate for up to 2 days or freeze for up to 3 months. Thaw in the refrigerator before cooking.

Monday, November 1, 2010

Pumpkin Spice Muffins

Well, our area made it into the morning of November 1st before we experienced a “killing frost”, and I am quite certain that this is the first, and will be the last, time I can say that I was picking tomatoes and peppers from my garden through Halloween. :) It has been a nice, warm autumn and I am grateful.


Today the garden area is rather bleak—the withered, blackened plants tied to tall sticks look barely capable of holding up the remaining, sad-looking tomatoes. And the beautifully-colored leaves have all come down during storms over the past week. I guess that, like it or not (and I don’t), winter is on its way.


I made muffins for breakfast this morning, and in honor of November, they were pumpkin spice.


I’ve made several different pumpkin spice muffin recipes but always come back to this one that I adapted from Home for the Holidays, Festive Baking with Whole Grains by Ken Haedrich. The original recipe uses melted butter, but canola oil stands in nicely (and with less saturated fat). I baked a double batch today and froze the muffins. When I do this, instead of doubling the canola oil, I sub pureed canned pears for half of the oil (½ cup oil, ½ cup pureed pears). It’s surprising how well this works in keeping the muffins moist, yet reducing the fat content in them.


* Exported from MasterCook *


Pumpkin Spice Muffins


Recipe By: Ken Haedrich

Servings: 12


Amount Measure Ingredient -- Preparation Method

-------- ------------ --------------------------------

1 large egg

1/3 cup skim milk

1/3 cup orange juice

1/4 cup canola oil

1 tablespoon molasses

1 cup canned pumpkin

2 teaspoons lemon zest -- (finely grated)

3/4 cup packed brown sugar

3/4 cup all-purpose flour

1 cup white whole wheat flour -- or whole wheat pastry flour

1/3 cup yellow cornmeal

2 1/2 teaspoons baking powder

3/4 teaspoon salt

1 teaspoon pumpkin pie spice -- *see Note

1/2 cup walnuts -- toasted and chopped


Preheat oven to 400F. Spray a 12-cup muffin tin with cooking spray and set aside.


In a medium bowl, beat the egg lightly, then add the milk through lemon zest and stir until combined. Add in the brown sugar and whisk until the sugar is dissolved. Set aside.


In a large bowl combine the flours through the spices. Make a "well" in the center of the flour mixture. Give a couple of stirs to the egg mixture, then pour the liquid ingredients in. Mix lightly until only a few streaks of the dry ingredients remain. Add the walnuts and mix just until combined.


Scoop into the muffin cups. Bake for about 18 minutes, or until a toothpick inserted in a center muffin comes out clean. Cool on wire rack. Serve warm or freeze for later use.


Source:

"Homemade for the Holidays"

- - - - - - - - - - - - - - - - - - -

Per serving: 256 Calories (kcal); 8g Total Fat; (28% calories from fat); 6g Protein; 41g Carbohydrate; 16mg Cholesterol; 255mg Sodium

Food Exchanges: 1/2 Grain(Starch); 0 Lean Meat; 1 1/2 Vegetable; 0 Fruit; 1 1/2 Fat; 1 Other Carbohydrates


NOTE : *- Instead of pumpkin pie spice, a mixture of 1/2 teaspoon ground cinnamon, 1/4 teaspoon ground nutmeg, and 1/4 teaspoon ground cloves may be substituted.


I (almost) always have toasted walnuts and almonds in the freezer. They will last for several months, and I don’t have to remember to toast the nuts before starting the recipe.

Thursday, October 21, 2010

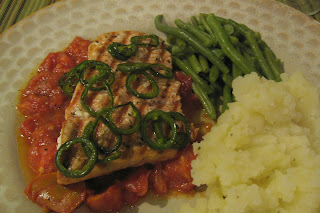
Grilled Salmon with Melted Tomatoes

We are still avoiding that “first frost”, and I am still harvesting tomatoes from my garden.


Another beautiful fall day here, and I spent the whole day outside cleaning the birdbaths and other miscellaneous garden statuary and putting things away for the winter. I bought a salmon fillet the other day and decided that we should have it for dinner. There were some beautiful tomatoes finishing ripening on the patio table, and I remembered a recipe which I have wanted to try but hadn’t, yet.


I came across this recipe from Food and Wine while flipping through their August issue recently. It seems as though I didn’t have a lot of time this summer to look at my magazines, since there is a rather large pile of them waiting to be read. I should be reading about Thanksgiving recipes, though, so I have to start reading faster I suppose. :)


I first noticed the recipe because of the photo—a large salmon fillet on top of a bed of cooked tomatoes and covered with jalapeno slices. It was beautiful. I have a ton of jalapeno peppers in the garden, lost of fresh tomatoes, and a salmon fillet just waiting to be turned into something wonderful. Sounded like a perfect idea for dinner!


Salmon and tomatoes are a great combination, and this recipe did not disappoint. I did expect much more heat from the jalapenos, but I figure that I took out too many seeds (actually, I took out all of the seeds!). Next time, I will remove maybe half of the seeds and see how that turns out.


And a note to anyone out there who do not like tomato skins (and you know who you are!!!), this is not the recipe for you unless you take the time to skin the tomatoes first. The slow simmering of the tomato chunks separated many of the skins and although I don’t mind the texture it didn’t look particularly appetizing (I picked some out before I took the photo below. Jack is so patient!).


I served with garlic mashed potatoes and green beans (alas, not from the garden).


* Exported from MasterCook *


Grilled Salmon with Melted Tomatoes


Recipe By : adapted slightly from Marcia Kiesel
Serving Size : 5


Amount Measure Ingredient -- Preparation Method
-------- ------------ --------------------------------
3 tablespoons olive oil
5 whole jalapenos
2 pounds red ripe tomatoes -- coarsely chopped
32 ounces salmon fillet -- cut into two pieces


Remove stem from jalapenos and slice thinly. For a mild dish, remove all seeds and transfer the pepper "circles" to a plate. The more seeds that are left with the peppers, the hotter the finished dish will be.


In a large, deep skillet heat olive oil. Add the jalapenos in a single layer and cook over moderately low heat without stirring until softened, about 6 minutes. Using a slotted spoon, transfer the jalapenos to a small plate and set aside.


Preheat a grill or grill pan.


Add the chopped tomatoes to the skillet and cook over high heat until they release their juices, about 4 minutes. Using a slotted spoon transfer the tomatoes to a bowl, the boil the remaining tomato juices in the pan over high heat or until thickened, adding any additional accumulated juices from the bowl. * Return the tomatoes to the skillet and season with salt.


Rub the salmon on both sides with olive oil, and grill over moderate heat for about 5 minutes, turn carefully with a wide spatula, season with s & p and continue to grill until the salmon is opaque in the center (3-6 minutes, depending on the thickness of the fish).


Toward the end of the grilling time, reheat the tomatoes gently in the pan. Spoon the tomatoes and their juices onto a serving platter, place the salmon fillets on top, and cover the fish with the jalapenos.


Source:
"Food & Wine, August 2010"

- - - - - - - - - - - - - - - - - - -

Per serving: 321 Calories (kcal); 15g Total Fat (2g Saturated); (42% calories from fat); 38g Protein; 8g Carbohydrate; 94mg Cholesterol; 137mg Sodium


NOTES : *- I must have used "meatier" tomatoes than the person who developed the recipe because I didn't have a lot of excess tomato juices. The was so little that I decided that they would probably burn in the pan if I tried to reduce them. So I killed that entire step of removing the tomatoes from the pan and reducing the excess juices.

Sunday, October 17, 2010

Prosciutto-Wrapped Tilapia with Fresh Sage

I normally wouldn’t have given this recipe a second glance. We don’t eat red meat, so if my eyes saw “proscuitto” my brain might not have even registered it. And it honestly didn’t even sound appealing to me-- Proscuitto-Wrapped Tilapia with Fresh Sage. But a friend recommended it to me and I am so glad that she did.


Of course, I didn’t use proscuitto. I did use my favorite turkey bacon. Although the turkey bacon that I’ve bought in grocery stores is adequate, none of those brands can hold a candle to what I buy in Sam’s Club. A couple of years ago, while shopping there, I was given a sample of turkey bacon. I usually avoid these sample carts, but the bacon smelled so good and I probably was hungry to begin with (it seems as though I am always hungry). It was delicious. Thick sliced and smoky, I remember that I took at least a second sample. Then I bought a 2 pound package.


The brand name at the time was Kutztown. However, a few months ago it was no longer in the case. I finally wrote to the company and was told that Sam’s Club is still using their bacon, but it’s now being sold under the Member’s Mark brand. I bought a package and, yay!, it’s the same.


This is what I used in place of the proscuitto in the following recipe. The fish was positively delicious.

In addition, the tilapia fillets were thin, so I sandwiched two fillets together and wrapped the turkey bacon around, sliding a fresh sage leaf under each side.


And do not toss that sage leaf. We both discovered that eating a tiny bit of the crisp sage with the tender fish and smoky bacon was the best way to enjoy this. I sauteed potatoes, zucchini, yellow squash, and onion as a side.


Prosciutto-Wrapped Tilapia with Fresh Sage


Recipe By : Cuisine at Home “Fresh & Fabulous”
Servings: 4


Amount Measure Ingredient -- Preparation Method
-------- ------------ --------------------------------


2 tablespoons lemon juice
2 tablespoons parmesan cheese -- shredded
1 tablespoon olive oil
2 teaspoons honey
1/2 teaspoon kosher salt
1/4 teaspoon red pepper flakes
18 ounces fish fillets
8 leaves sage -- fresh
4 slices prosciutto (I used thick-cut turkey bacon)
4 teaspoons olive oil -- divided


Preheat grill to medium-high. Brush grill grate with oil.


Stir together lemon juice, Parmesan, 1 T oil, honey, salt, and pepper flakes for the topping; set aside.


Pat fillets dry with paper towels. Place 2 sage leaves on each fillet. Wrap 1 slice of prosciutto (or turkey bacon) around sage and fillets. Secure with toothpicks.


(I had small, thin fillets, so I sandwiched two together, wrapped the turkey bacon around, and slid a sage leaf under the bacon on each side)


Spray the fillets liberally with cooking spray and grill fillets, covered, until cooked through, 3-4 minutes per side. Remove toothpicks. Drizzle with the lemon-Parm sauce.


Saturday, October 16, 2010

Garden Musings

I planted my garden late this year, and it is still producing lots of tomatoes and peppers. According to my calendar, last year our first frost was on October 19th. That’s only 3 days away, and even if the temps overnight stay above 40F for the next couple of weeks, I’m worrying about if all of the green tomatoes will ripen by then.


These are my favorite tomatoes, although they have not been as prolific this year as they have been in years past. My Dad’s cousin brought the seeds over from Italy years ago and a nursery grows plants (for Dad and also to sell) every year.


They are large (each well over a pound), with a full tomato flavor and few seeds.


I will longingly look at these photos in December, January, February, March…well, you get the idea. I don’t often buy fresh tomatoes in winter, and it’s because I know all too well what they taste like at the end of summer.


And as long as I’m posting photos, rather than recipes, here’s another. I broke down and bought a garden flag a few weeks ago because I loved the design (wonder why?). Of course, then I had to buy a flag holder, too. :) I placed it in our flower bed that I see easily from the kitchen window, and set a large pail of mums next to it. Then Spooky came by to look picturesque, so I complied…


Thursday, October 14, 2010

Grilled Chicken Flatbread Pizza


It’s autumn. I’ve been trying to deny it for the last few weeks, but I no longer can. The writing’s on the wall—winter is coming.


The nice, warmish days are now being spent outside. The garden is still producing, and I spent yesterday clearing and straightening up the flower beds. These chores always take longer than I had planned, and by the time I accomplished what needed to be done then went out for a quick run, it was very late. The only television show which I watch (Burn Report, a cable show being rerun on a local station) was on at 8, so I scrambled to get dinner on the table.


I had met my friend Jenni in the Strip District on Tuesday. For those who don’t know, this is an area of Pittsburgh that is filled with food shops, restaurants, and other interesting places to wile away an afternoon. Before we met for lunch I did some shopping and picked up a package of my favorite pocketless pita breads. It was this that I saw when I opened the refrigerator door last evening at 6:45pm, and my inspiration for a very quick dinner.


No recipe, though. How do you follow a recipe when you want to get dinner on the table asap? Who has time to measure (and read)???


I did think ahead and put a large chicken breast half in the microwave to thaw before I went to take my shower so it was ready.


I lit the grill, mixed up some olive oil, balsamic vinegar, fresh oregano, minced garlic, and s&p in a small cut. I brushed the chicken with some of this and grilled it, then also brushed slices of zucchini and onion and grilled those as well. While these cooked, I chopped a tomato and drained it on paper towels for a few minutes.


I removed the chicken and veggies from the grill, turned the heat down and lowered the lid, and chopped the chicken and vegetables. I placed the pocketless pitas on the bottom of a baking sheet (to easily slide the pitas onto the grill) and arranged the onion and zucchini, then the tomatoes and chicken, sprinkled oregano and the rest of the olive oil mix, and crumbled feta over all. The pitas were slid onto the grill and the lid closed. Each one took about 4 minutes (I turned each 45 degrees halfway through), just enough to warm everything and crisp the bottom.


Quick, delicious, and endlessly adaptable to whatever you should have on hand. This might be the last time we have these until next spring (as I only use my grill in the warm months) and I am already anticipating what veggie and cheese mixture I will be able to use then. Spring… asparagus? And pecorino romano? I have 5 months to ponder on this, alas… ;)


Wednesday, October 6, 2010

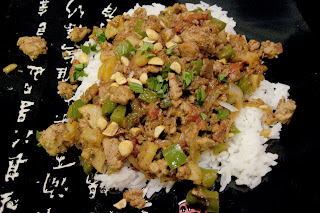
Thai Ground Turkey Stir Fry

There were 5 pounds of ground turkey in the refrigerator and, after portioning and wrapping for the freezer, I had an odd amount (7 ounces) left over for dinner. I wanted to make stuffed peppers, but it was pouring rain and I didn’t feel like venturing into the garden to harvest (that is a much better experience when done on a nice, sunny, warm day!). I looked at what was in the fridge, then asked Jack what type of food he would like. He asked for some sort of stir-fry, and back to the kitchen I went.


I decided on Thai because I just happened to look outside and saw my large pot of Thai basil flourishing. Even though I will freeze the leaves before frost kills the plant, fresh just tastes so much better. I thought for a minute, made a couple of notes on back of a magazine subscription card that was lying on the table, and started to cook.


What resulted was a very easy, quite delicious dinner.


Jack got up from the table halfway through our meal to pour more wine (we found that it’s not a good idea to keep the bottle on the table while we eat…). After he sat down, he looked at me and said this exact quote:


“I swear to God, if you tell me that you’re going to leave me and will only make me 10 more meals before you do, this would have to be one of those.”


Um… where am I going?


(Honey, thanks for the compliment. I think.)


Anyway, this was really good. And quick. Just for color, I'll use red bell pepper next time.


* Exported from MasterCook *


Thai Ground Turkey Stir Fry


Recipe By: Vicci

Servings : 2


Amount Measure Ingredient -- Preparation Method

-------- ------------ --------------------------------


3/4 cup red curry paste

3/4 cup canned diced tomato -- undrained

1/4 cup light coconut milk

1 tablespoon fresh lime juice

2 teaspoons brown sugar

1 tablespoon fish sauce

2 teaspoons light soy sauce

1 tablespoon canola oil

6 ounces ground turkey

3/4 cup sliced onion

2/3 cup chopped green bell pepper

1 teaspoon minced garlic

4 ounces Morningstar Farms Recipe Crumbles

4 ounces canned waterchestnuts -- diced


hot, cooked jasmine rice


1 tablespoon chopped peanuts

1 tablespoon chopped fresh basil (Thai basil preferred), or cilantro


Mix the diced tomatoes and curry powder in a small bowl and set aside.


Mix the coconut milk, lime juice, brown sugar, fish sauce, and soy sauce in another small bowl and set aside.


Heat a wok over high flame, add oil, swirl to coat, then add the ground turkey. Stir fry until the meat is no longer pink. Add onion and peppers and stir fry until the peppers just starts to soften, about 3 minutes. Add garlic, stir, add burger crumbles and continue to stir fry for another minute.


Add tomato/curry mix to wok and continue to stir fry for a minute. Add water chestnuts, stirring. Stir in the coconut milk mixture and continue to mix for another minute or two until mixture is hot.


Serve over hot cooked rice, garnish with cilantro and peanuts.


- - - - - - - - - - - - - - - - - - -

Per serving: 412 Calories (kcal); 20g Total Fat (4g Saturated); (42% calories from fat); 29g Protein; 32g Carbohydrate; 67mg Cholesterol; 1460mg Sodium

Food Exchanges: 0 Grain(Starch); 2 Lean Meat; 2 1/2 Vegetable; 0 Fruit; 2 1/2 Fat; 1/2 Other Carbohydrates